Perspective Drawing Guide
Updated: 08 Jun 2026
In this guide, I will explain and demonstrate the basics for perspective drawing.
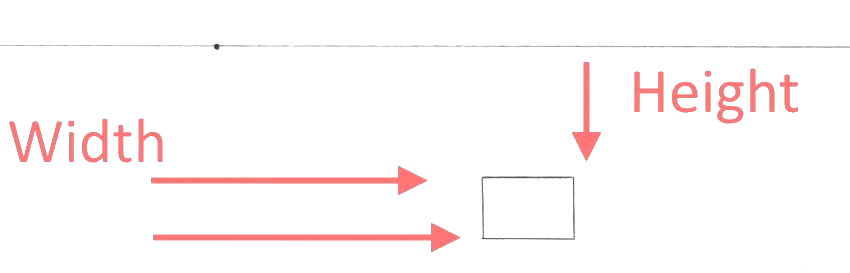
Perspective is the way to draw three-dimensional objects on a two-dimensional surface by giving the right impression of their height, width, depth, and position in relation to each other.
Linear perspective is one of drawing's fundamentals, and it is crucial for drawing from imagination.
Atmospheric perspective refers to the effect of the atmosphere on far away objects, and therefore it is used in landscape drawing and painting.
Table of contents:
Linear Perspective
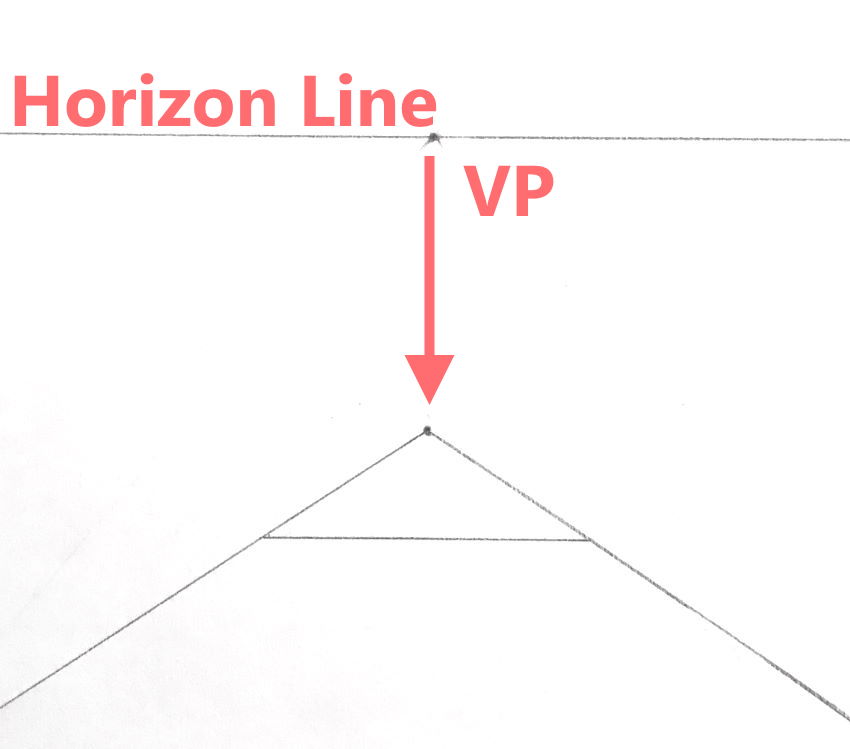
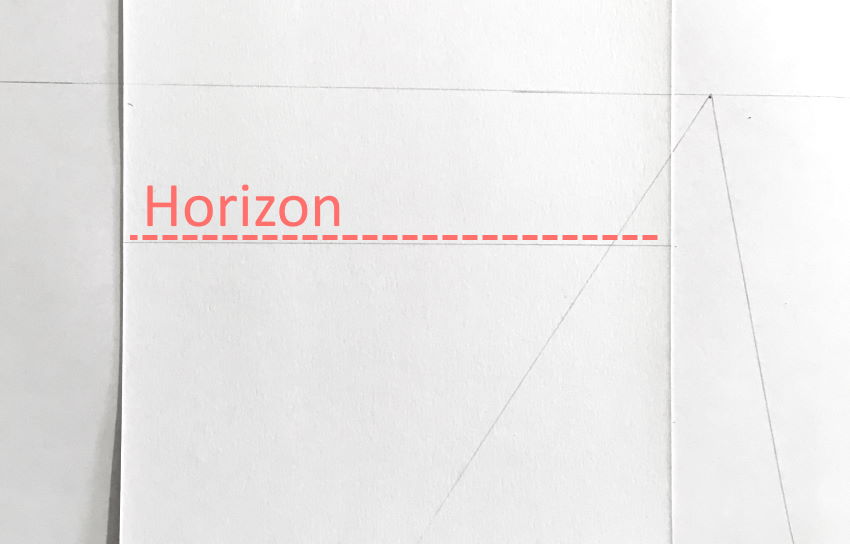
Each drawing that uses linear perspective has a horizon line that may be visible or invisible in the final drawing.
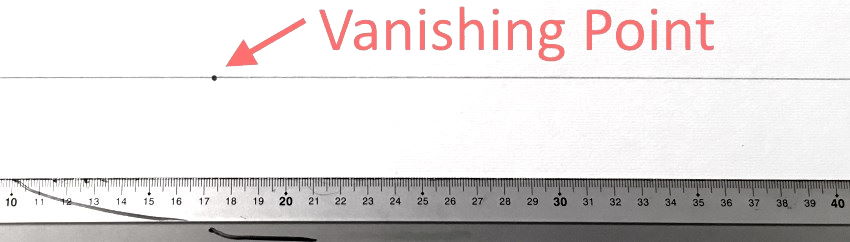
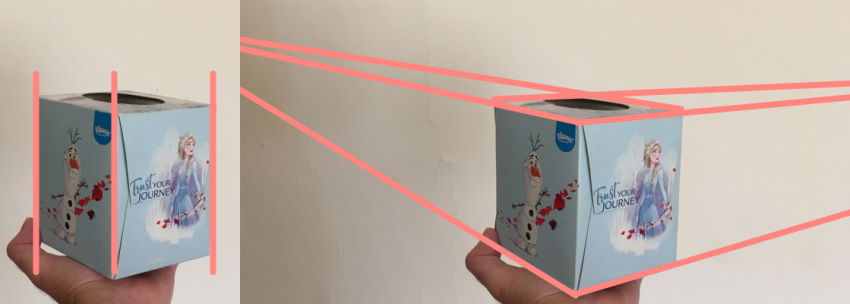
In each linear perspective drawing, there is at least one vanishing point (VP).
A vanishing point is a dot on the horizon line (in most cases, more on that later).
Lines, which are parallel in reality, meet at a vanishing point when drawn in perspective. To the human eye, although they are parallel, they seem to meet at a great distance.
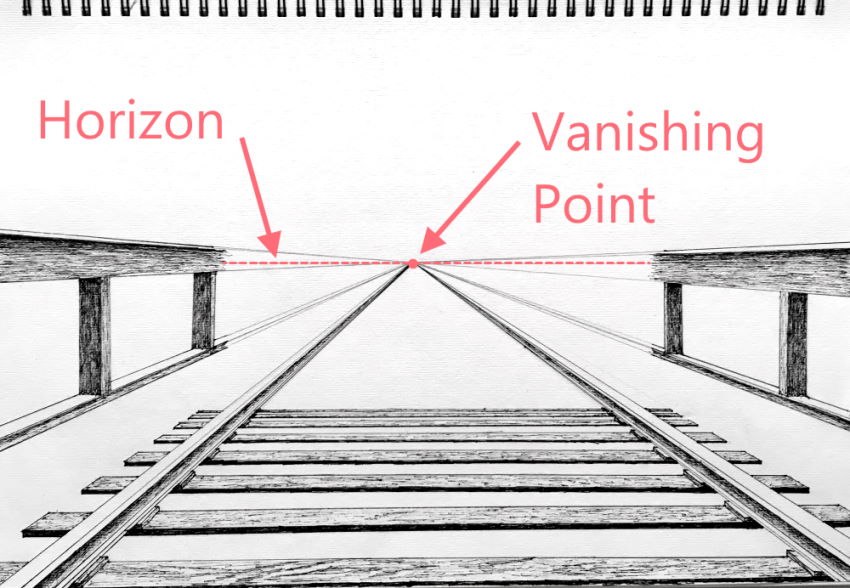
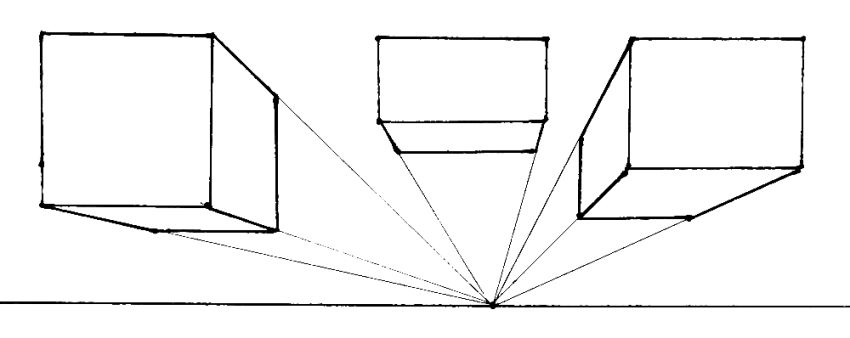
The most common types of perspective are with one vanishing point, two vanishing points, and three vanishing points.
Where to Draw the Horizon Line?
When drawing or painting, the horizon line's placement has a significant effect on the outcome.
You can use your "artistic license" to build different compositions with different horizon line placement.
More on that you can find in my guide on composition drawing for beginners.
In general:
- When the horizon line is at the center of a painting, it translates as eye level when looking forward.
- A low horizon line looks as if the viewer is looking above the horizon line, looking up.
- High horizon line translates as looking at an angle below the horizon line, looking down.
Examples of horizon line placements in my paintings:
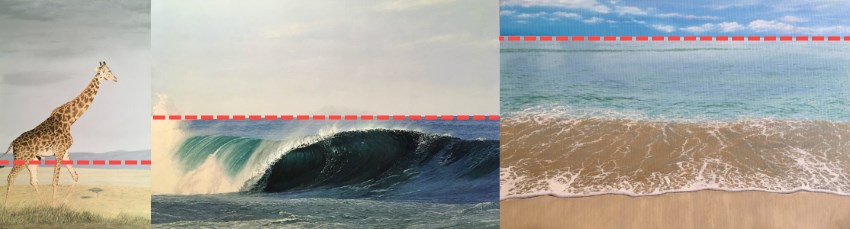
In other words, you can see the bottom of objects that are above the horizon line, and vice versa, the top part of objects that are below the horizon line.
Tip:
When an obstacle blocks the horizon (like a wall, buildings, mountains, trees, etc.), hold your drawing tool (pencil, pen, paintbrush, etc.) at eye level to find the horizon line.
Perspective Drawing Characteristics
There are two important rules to pay attention to when drawing in perspective.
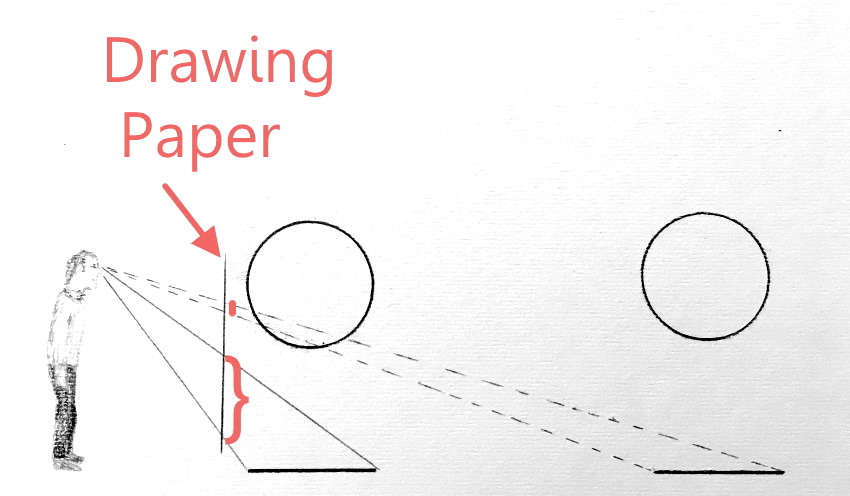
1. Objects Look Smaller with Distance
The farther an object is from the observer, the smaller it looks!
In other words:
Objects in front of the observer look smaller with distance, but they keep the ratio between height and width, meaning there is no distortion.
Visualization:

Explanation:
The farther away an object is, it takes less of your field of view and therefore looks smaller.
In the illustration above, the farther tree looks smaller, although the trees are identical.
Although the paper is flat, there is a sense of depth when one object is smaller (far), like in the next example:
2. Foreshortening
All objects are subject to foreshortening!
When objects are along your line of sight, they look shorter.
In other words:
Objects that are in the direction of your vision (meaning continuous) look shorter in that direction as they are farther away, therefore they are distorted. The reason is the change in the angle of sight.
Visualization:
Explanation:
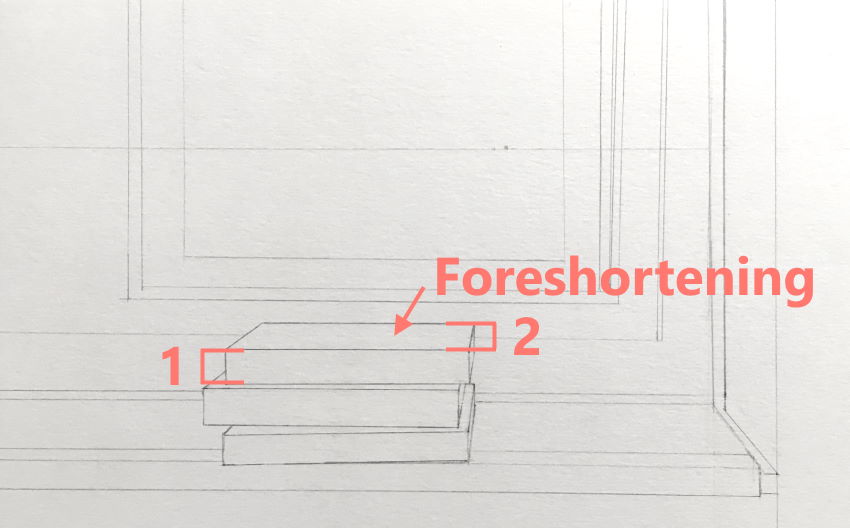
In the illustration above, you can see two flat circles (they can represent a lake or a biscuit).
When they are flat on the ground, their width gets smaller with distance, like in the first rule, but their depth is getting much smaller (depth, in this case, is represented as height since the drawing paper is flat).
Remember:
The closer an object is to the horizon (or to a vanishing point), the more it is foreshortened.
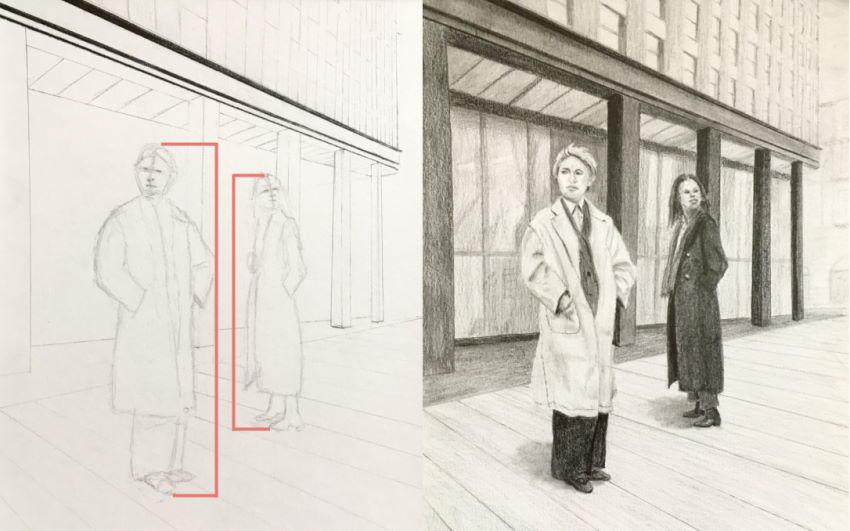
In the next example, the front of the book (1) is in front of the observer. The top of the book (2) is in the direction of sight and therefore foreshortened.
Because it is close to the horizon line, the foreshortening effect is strong.
When your drawing in perspective is ready, you can add brightness values for the final render.

For a better understanding of foreshortening, visit my guide on drawing from imagination.
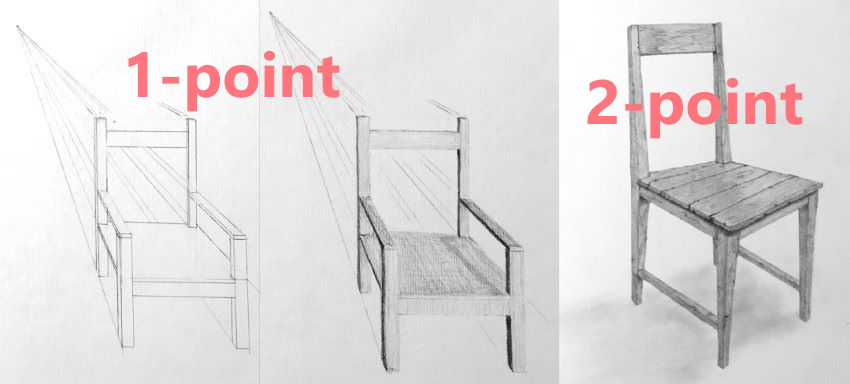
One-Point Perspective
 Boxes in 1-point perspective
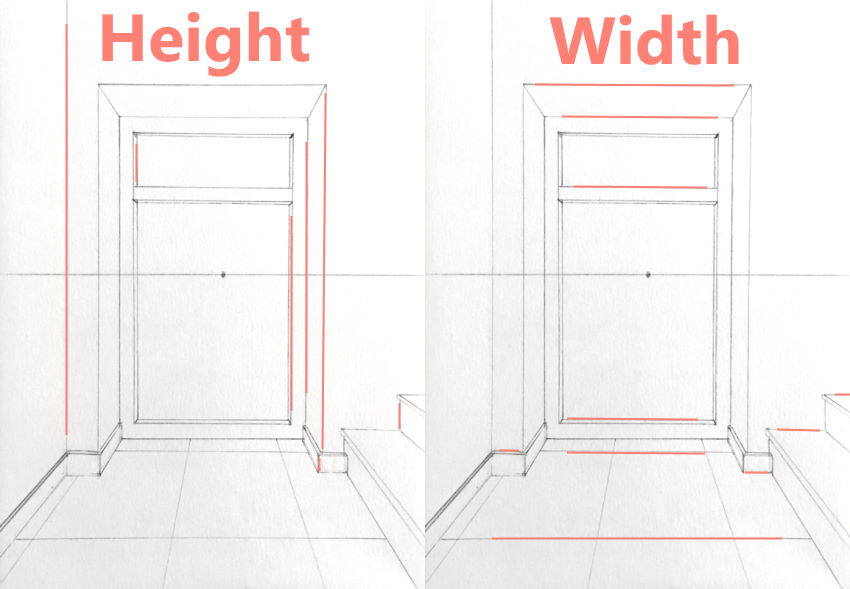
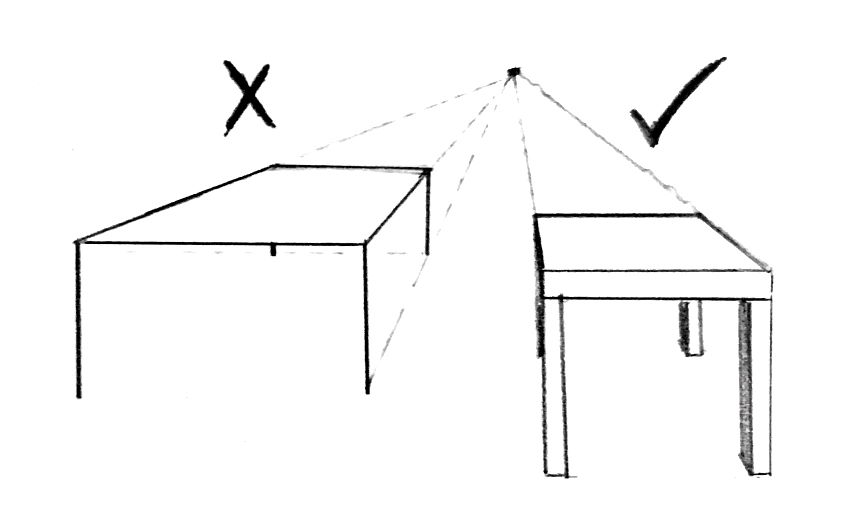
One-point perspective is used for drawing objects that are in front of the observer, and in reality their width lines are parallel to the horizon (and to each other), and their height lines are perpendicular to the horizon (and parallel to each other).
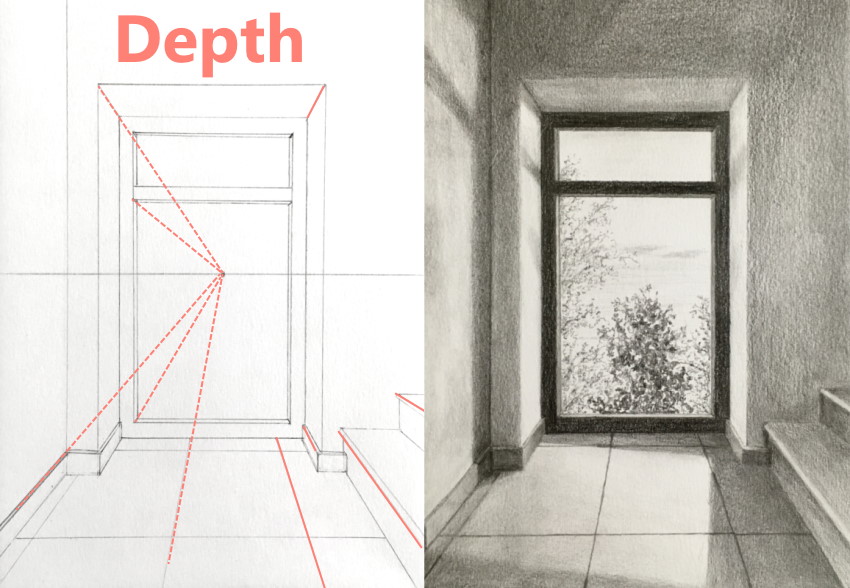
Lines that in reality are parallel (to each other) and represent DEPTH are NOT parallel when drawing in perspective; they meet at the same vanishing point on the horizon.
One-Point Basics
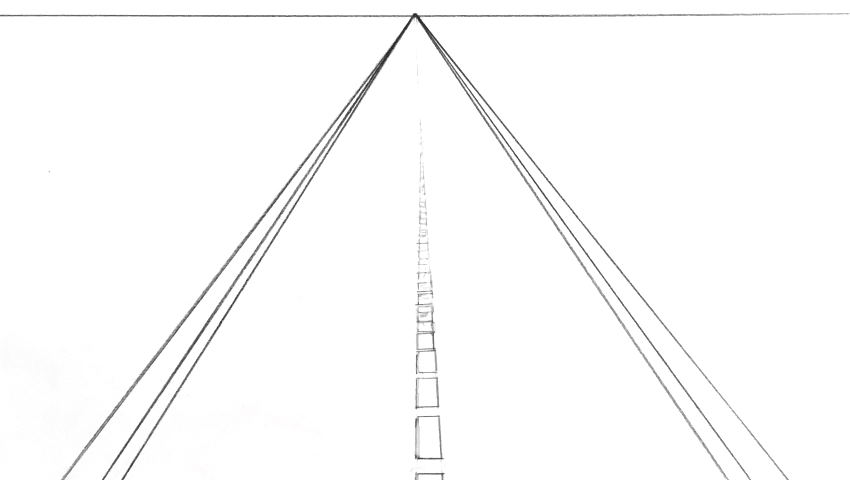
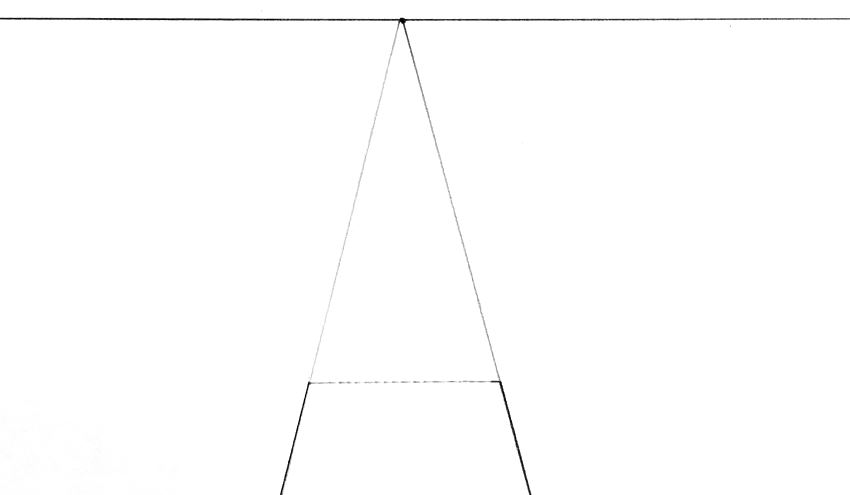
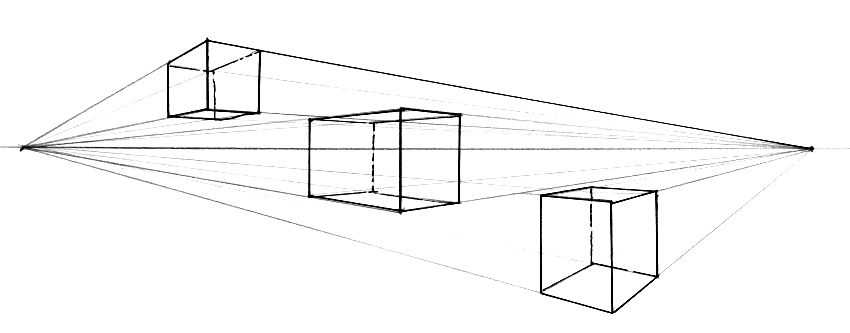
Start by drawing a horizon line with a ruler, and one vanishing point.
The horizon line helps as a guideline to draw other parallel width lines, AND to see how close objects are to the horizon line and therefore how foreshortened they are.
The vanishing point is the meeting point for depth lines. The closer objects are to the vanishing point, the more they are foreshortened.
Next, draw a rectangle.
Remember:
In one-point perspective, width lines are parallel to the horizon, and height lines are perpendicular to the horizon.
Now draw depth lines from the rectangle's vertices (corners).
Depth lines meet at the vanishing point:
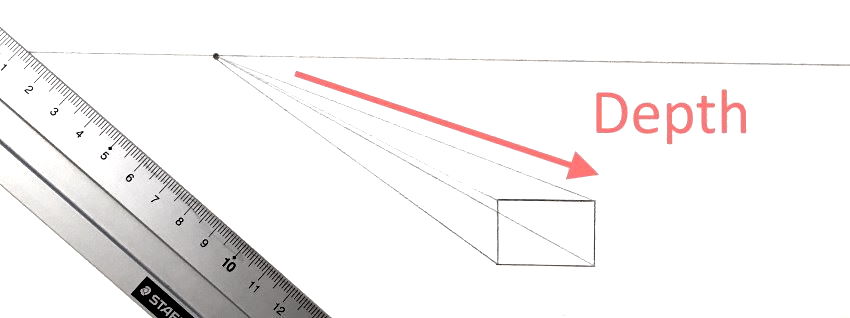
Determine the amount of foreshortening (the depth's length) and finish drawing a box in perspective:
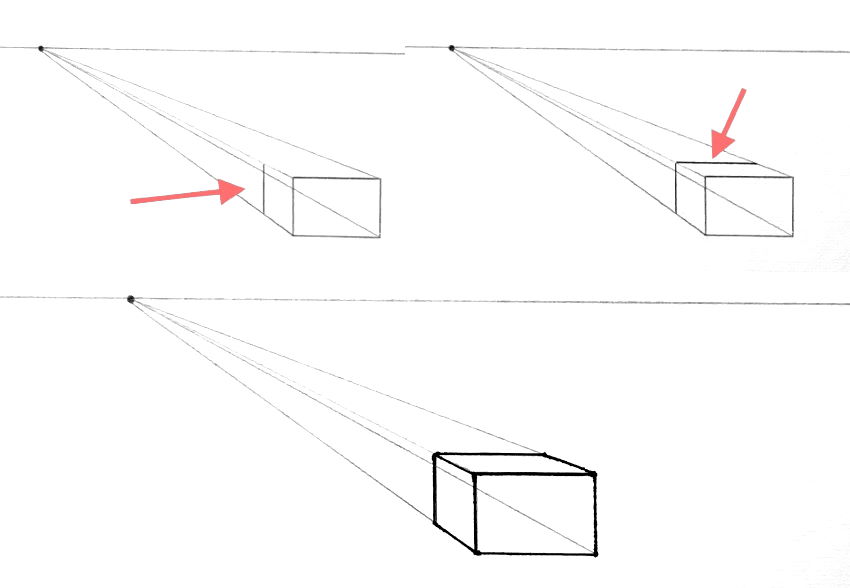
After you draw some boxes above, on, and below the horizon line, you can try a more complex object, like a chair.
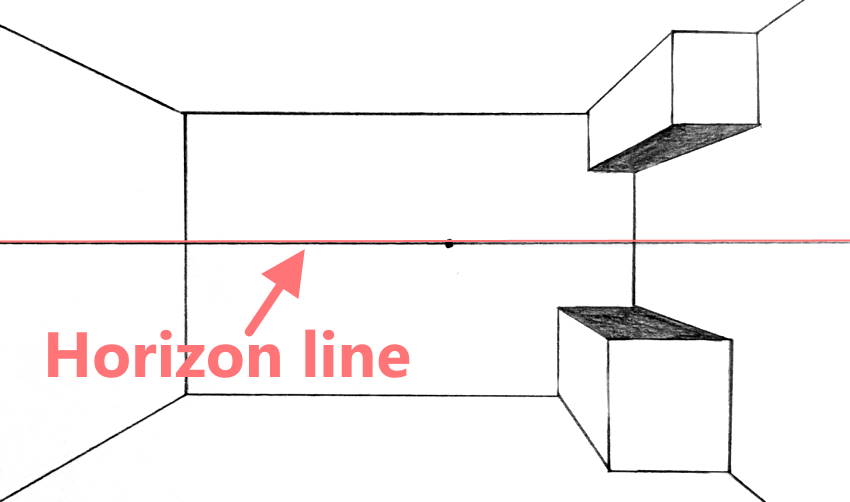
Good to know:
Objects above the horizon line are objects you need to look up to see.
Objects below the horizon line are objects you see from above. For example, looking down from an airplane or a tall building. Or just looking at objects on the floor, down at an angle.

Objects on the horizon are objects in front of you when you look forward. They can be higher on the horizon line, center to it, or lower on it:
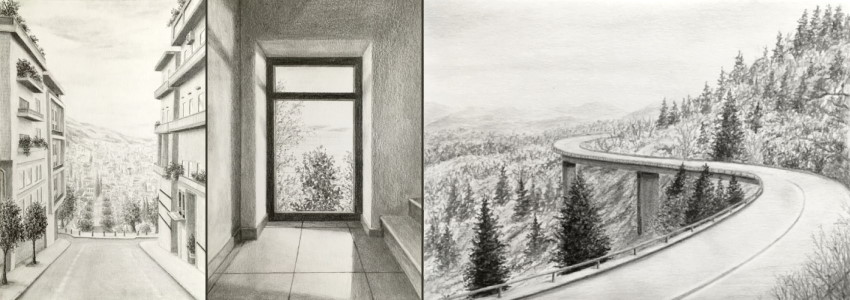
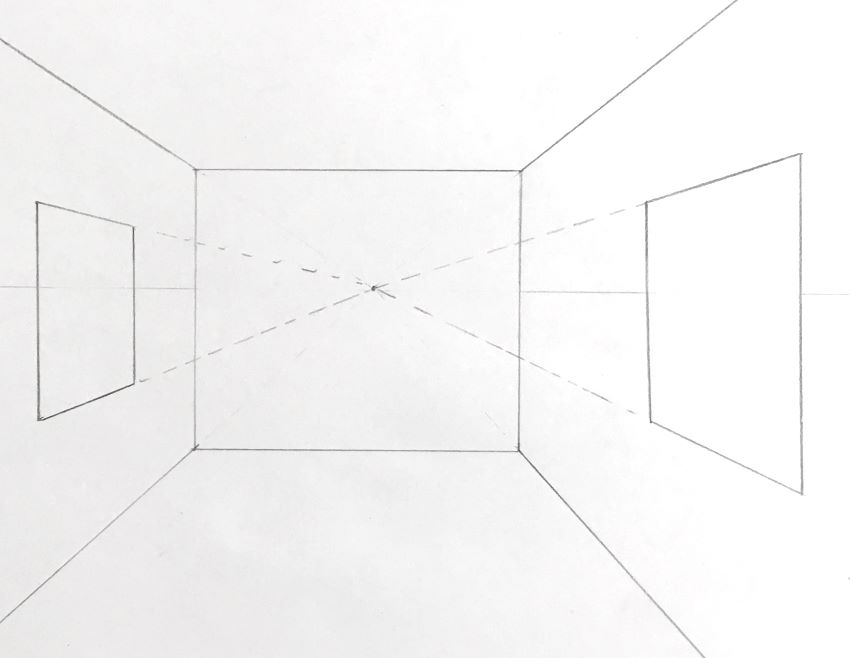
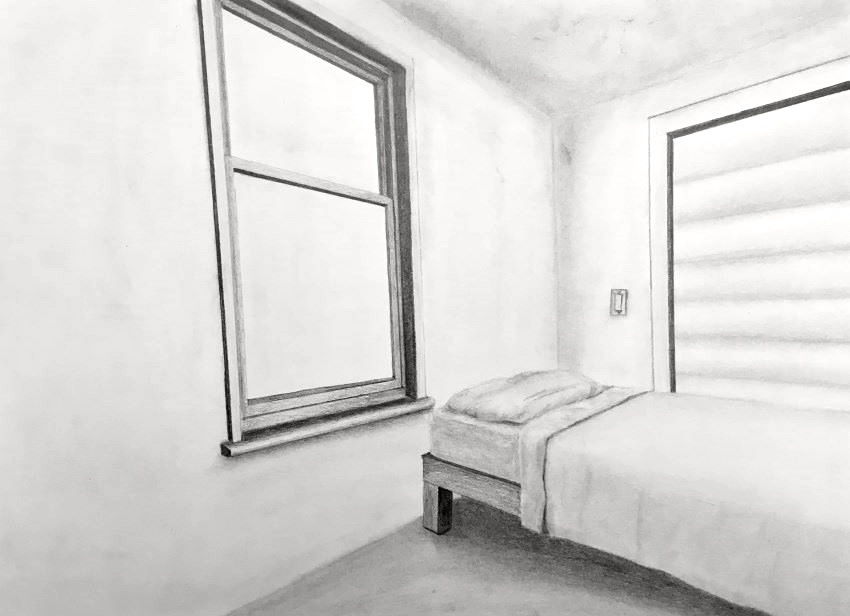
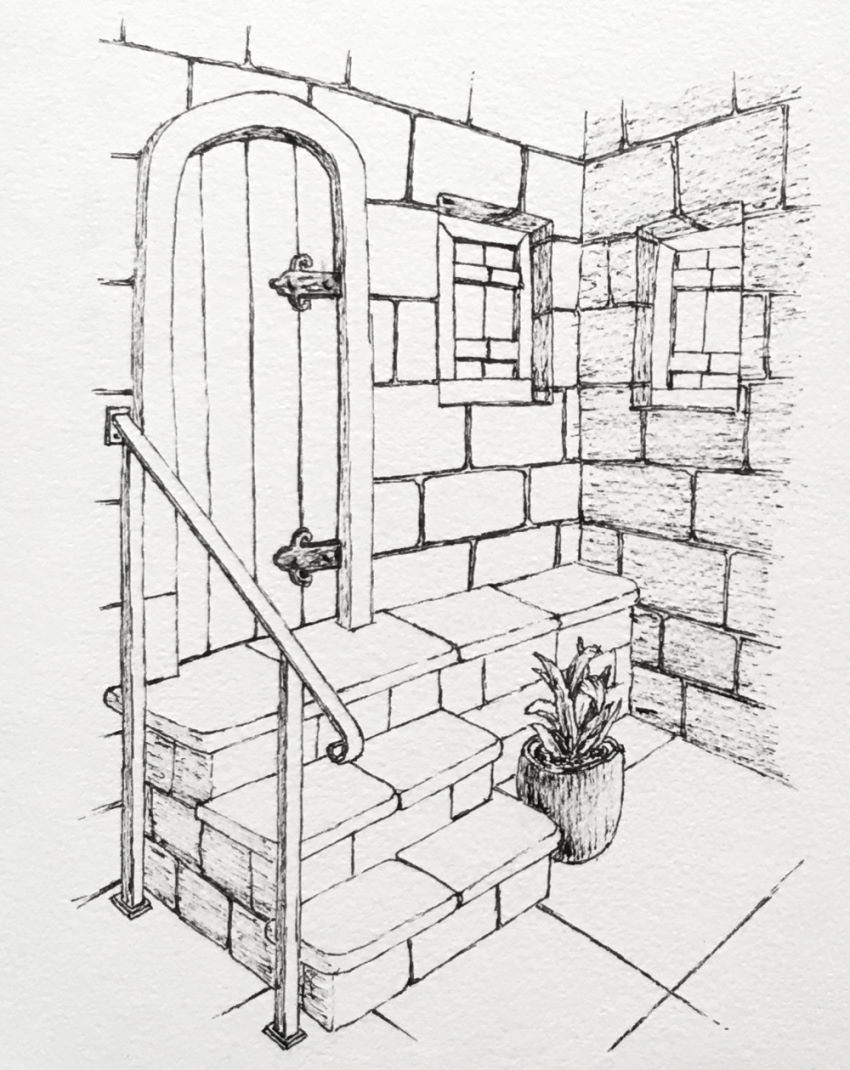
Interior Design in One-Point Perspective
When drawing an interior space, you are actually drawing inside a box.
Draw a horizon line with one vanishing point.
Then, draw a back wall (a rectangle).
Lastly, draw lines from the vanishing point for the walls. This is your basic room.
For a guide on materials, visit my drawing supply review.
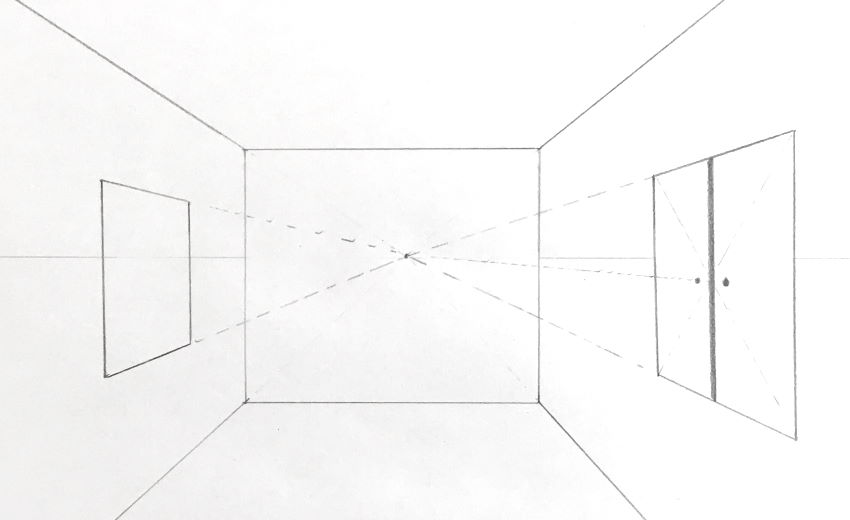
Next, draw some pictures and windows on the walls. Depth lines meet at the vanishing point.
Pay attention to foreshortening. The closer objects are to the horizon line (or to a vanishing point), the more they are foreshortened.
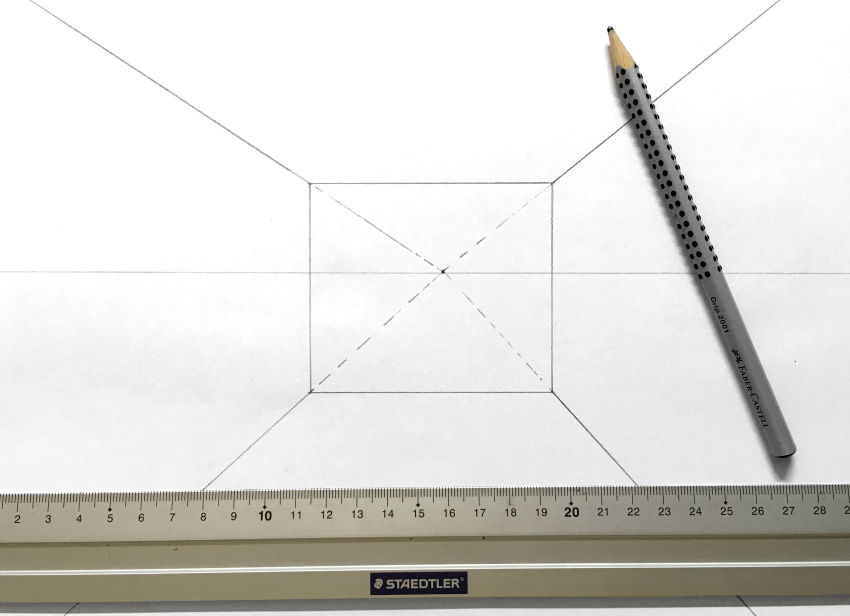
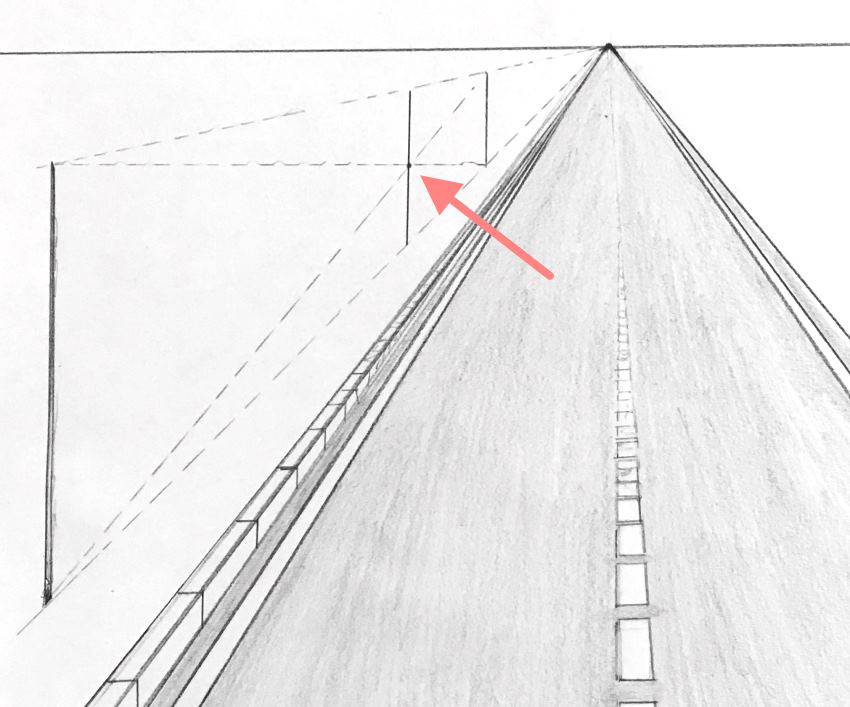
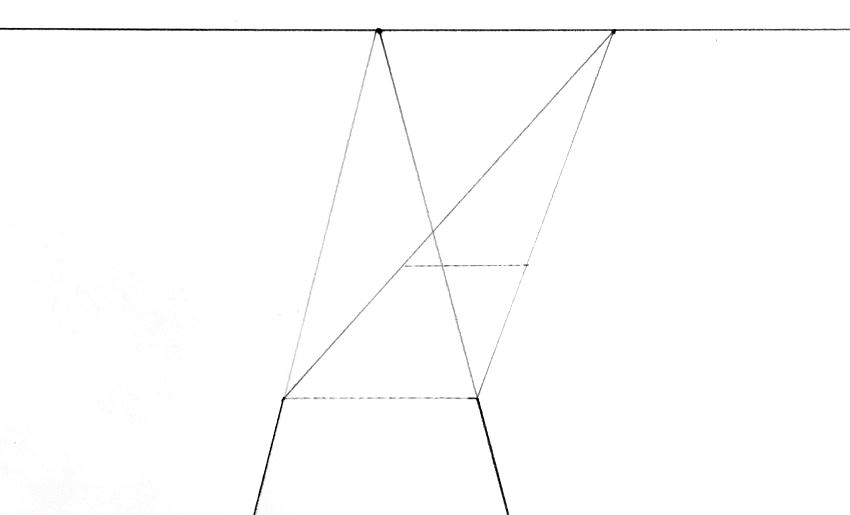
To find the center of a rectangle or a square (in perspective, meaning when they are distorted), draw two diagonals from the vertices.
Instead of guessing how small the back part (of a rectangle) is compared to the front part, this method does it accurately.
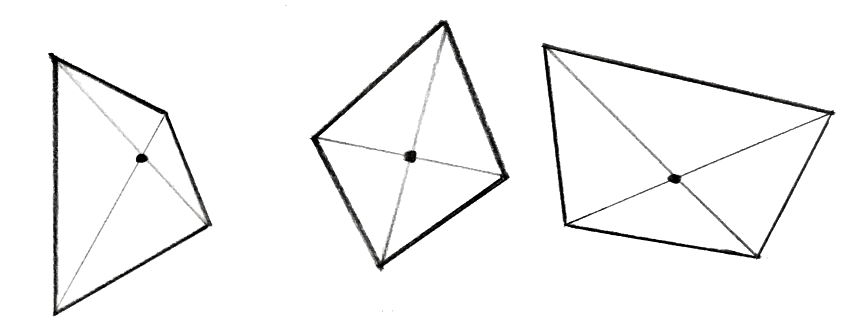
Use it to find the center point for your windows.
Draw softly, so it is easy to erase guidelines and parts that are hidden by overlapping.
Otherwise, too many guidelines look messy and confusing.
For box-shaped objects, start with the front rectangle.
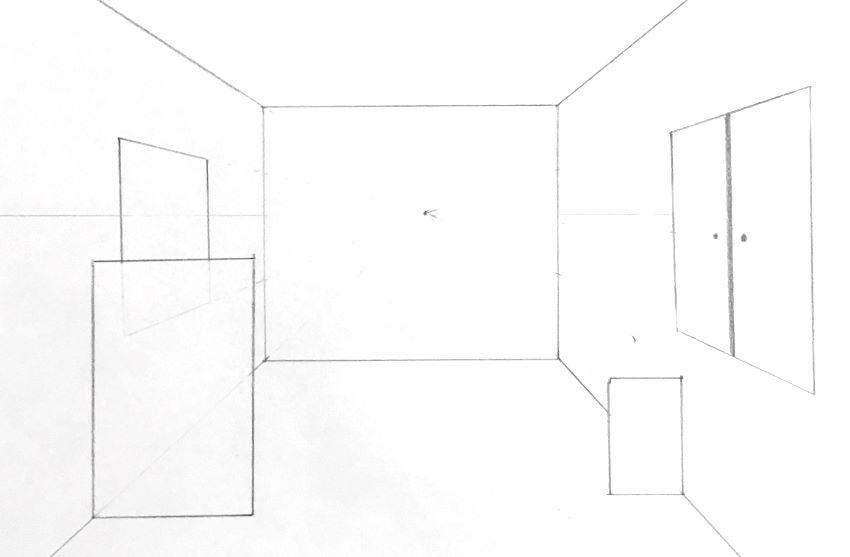
Then, draw depth lines toward the vanishing point, and determine the amount of foreshortening, depending on the length you want for the box.
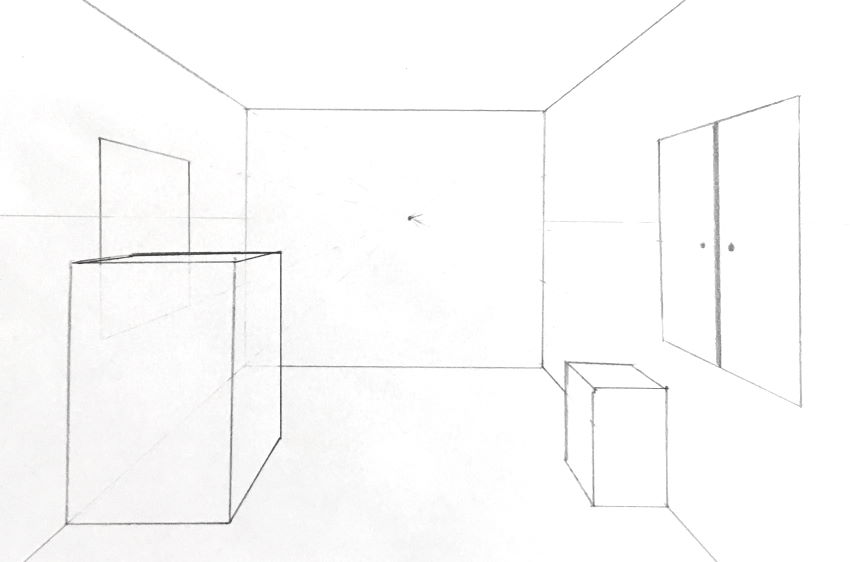
Finally, find the center point for doors and drawers.
The same center point helps with handles position.
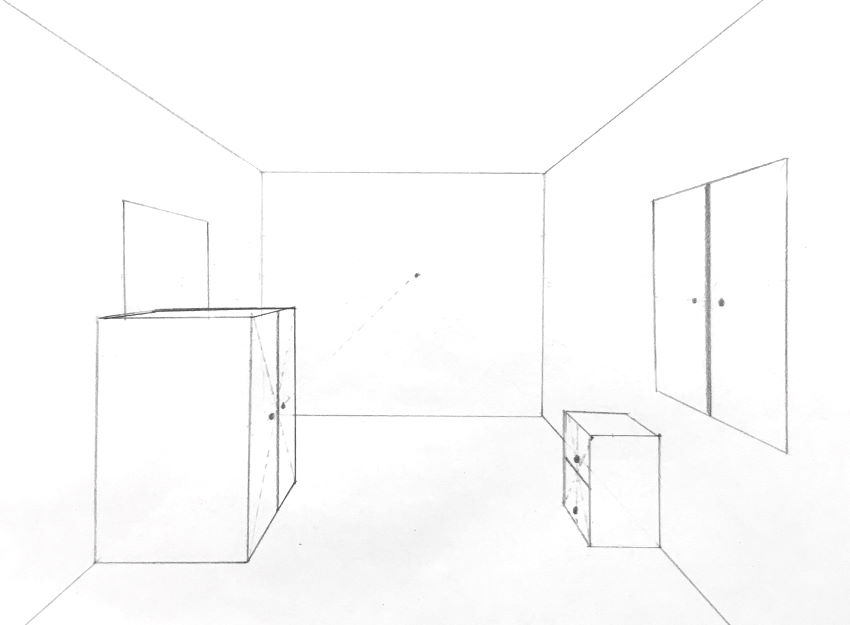
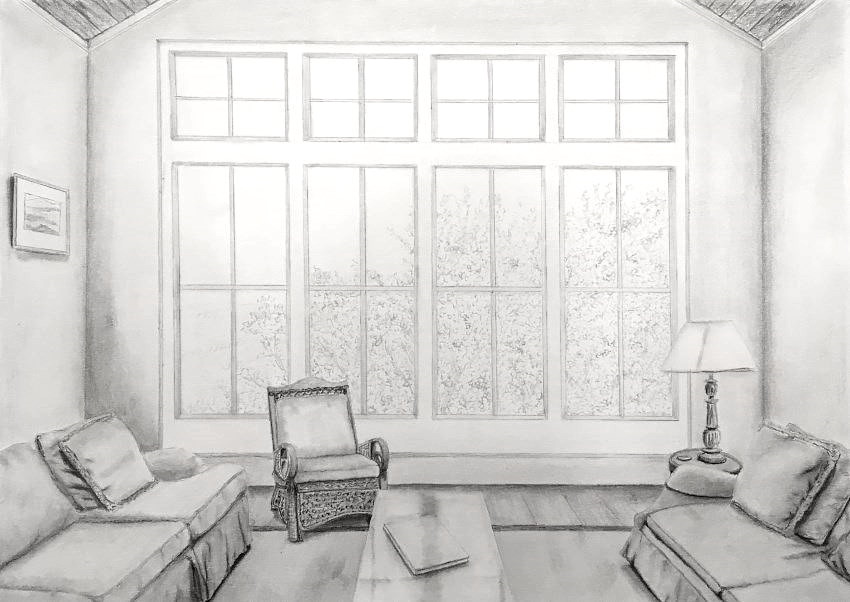
Once you practice drawing some rooms from imagination (and observation), in perspective, you can render them in many styles.
Sometimes line-drawing (with a pen or pencil) is very nice. I usually prefer realistic drawing.
If you are new to realism, read my guide on realistic drawing basics.
Something to consider:
While it is fast to draw a picture on the wall using a rectangle, in reality a picture has volume.
You can use lines (for cupboards, windows, pictures, tables, etc.), but once you understand linear perspective, it is time to pay attention to volume and details.
The same goes for tables or any other object.
I use the division method regularly when I draw from imagination.

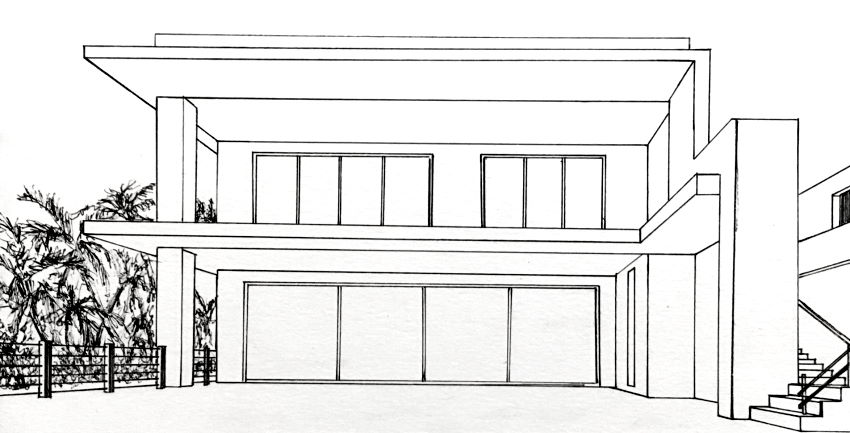
Exterior in One-Point Perspective
To draw a house is like drawing a box.
A villa is a set of boxes.
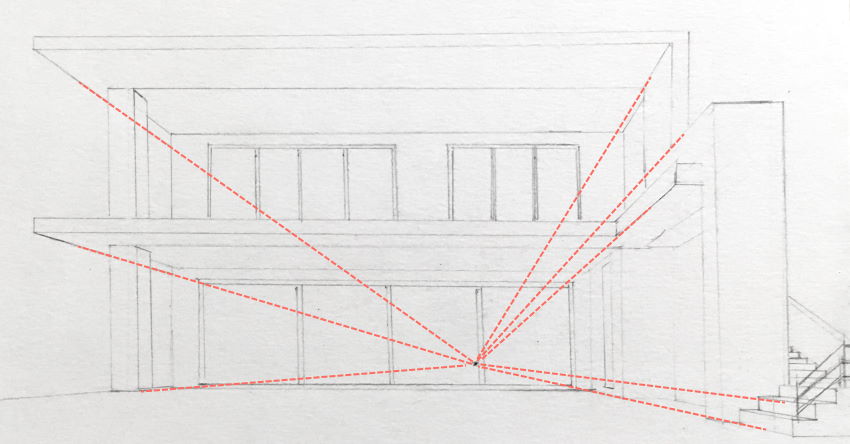
Drawing with a pen produces a clean render.
Pens for technical drawing produce lines with uniform thickness, and their ink is made of pigments and therefore very durable.
You can learn more about technical pens in my review for drawing pens.
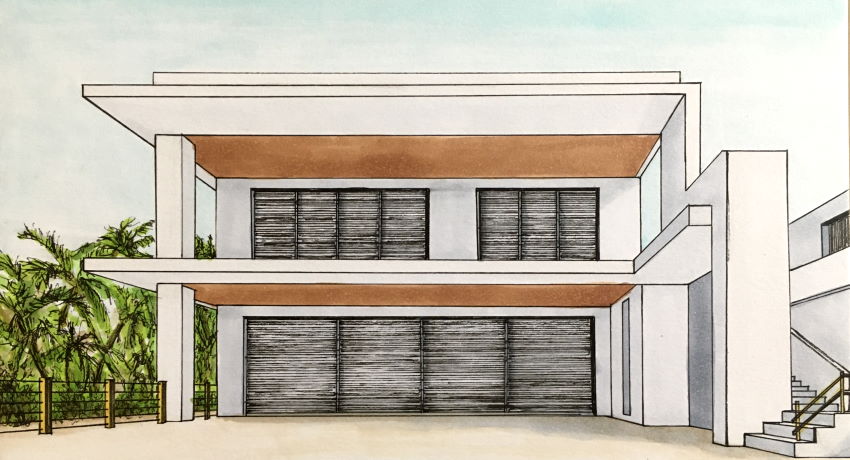
You can use markers (or any medium) for colors.
Here is a list of my recommended markers for drawing.
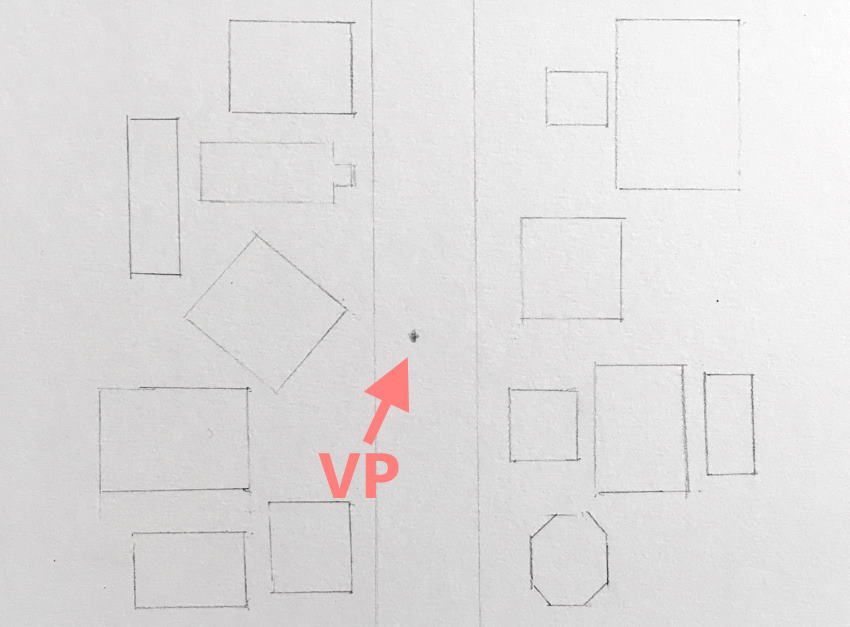
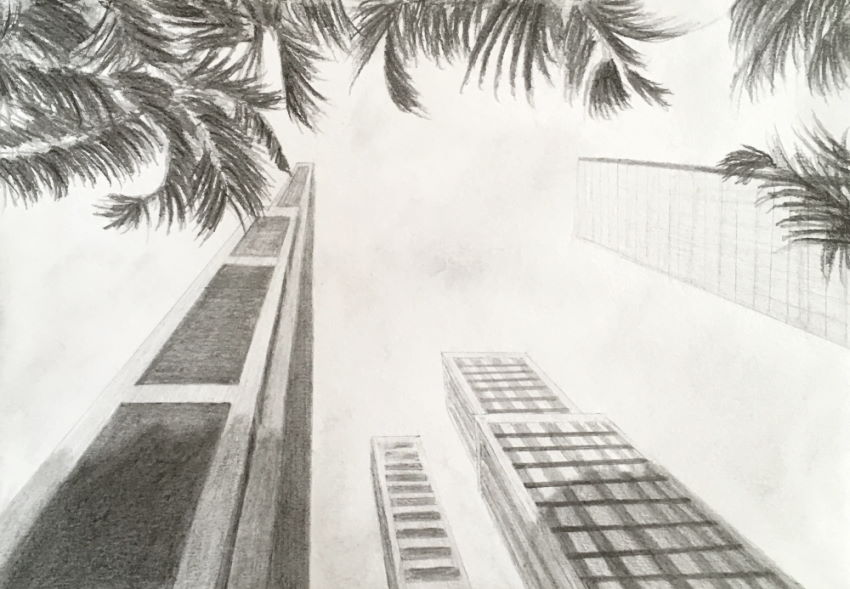
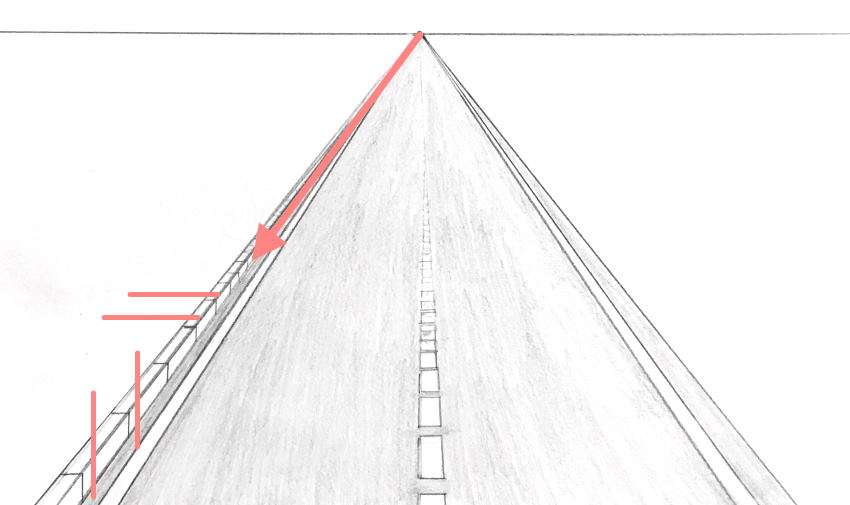
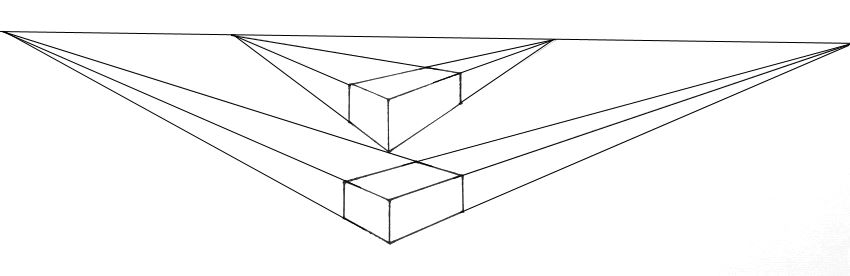
View from Above or Below
You can draw ANY surface that is in front of you (meaning, perpendicular to you) in one-point perspective.
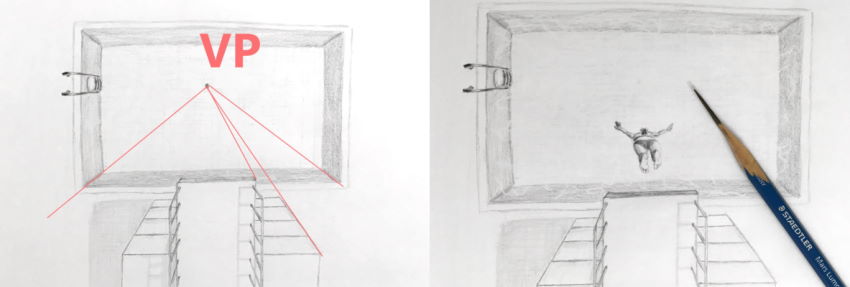
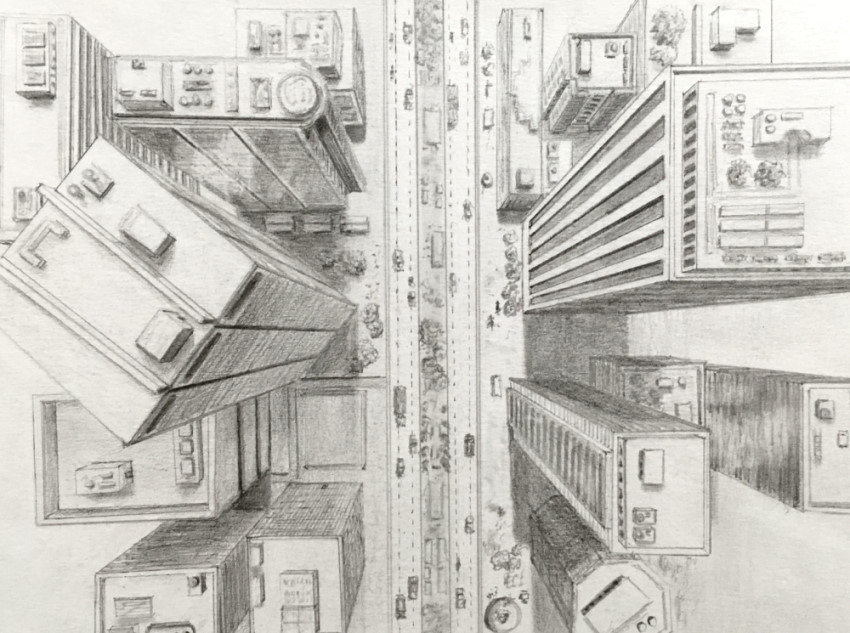
Here is an example of a ground plane in front of the observer. Looking directly from above.
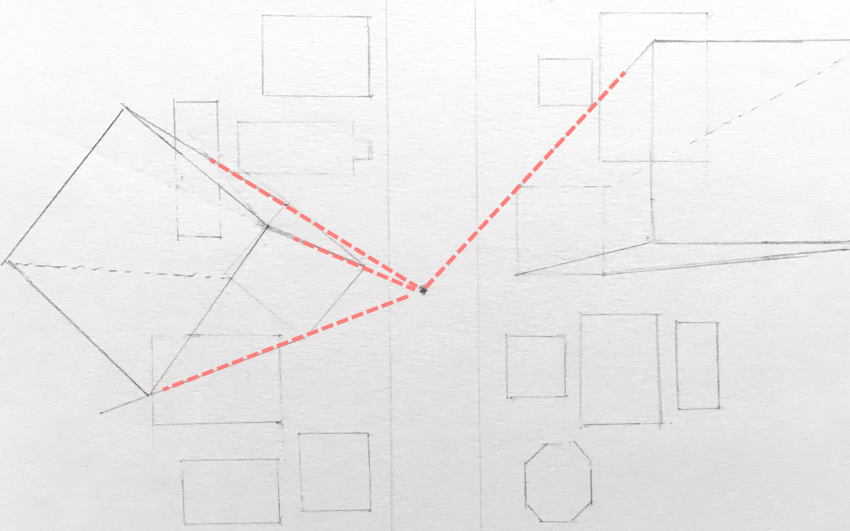
Start by planning your cityscape on the "ground" plane, and draw a vanishing point (VP).
Next, draw lines from the vanishing point for the top part of any structure (away from the vanishing point).
In this case, the depth lines represent the height of the buildings.
Draw all the structures (buildings) first before adding brightness values, so you do not smear the graphite particles.
Then, render in your favorite style, and add as many details as you like.
You can do the same when looking directly above.
In this case, draw to the vanishing point.
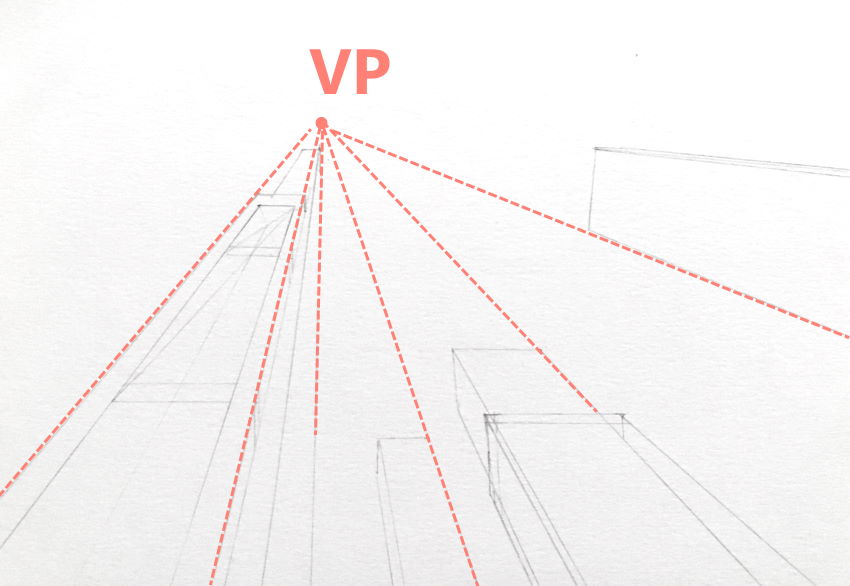
The closer a building is to the vanishing point, the taller it is.
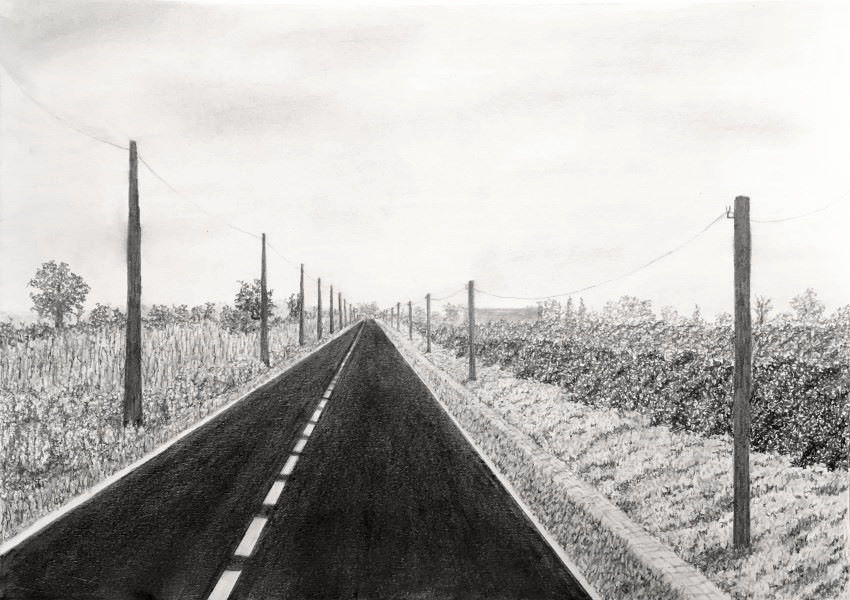
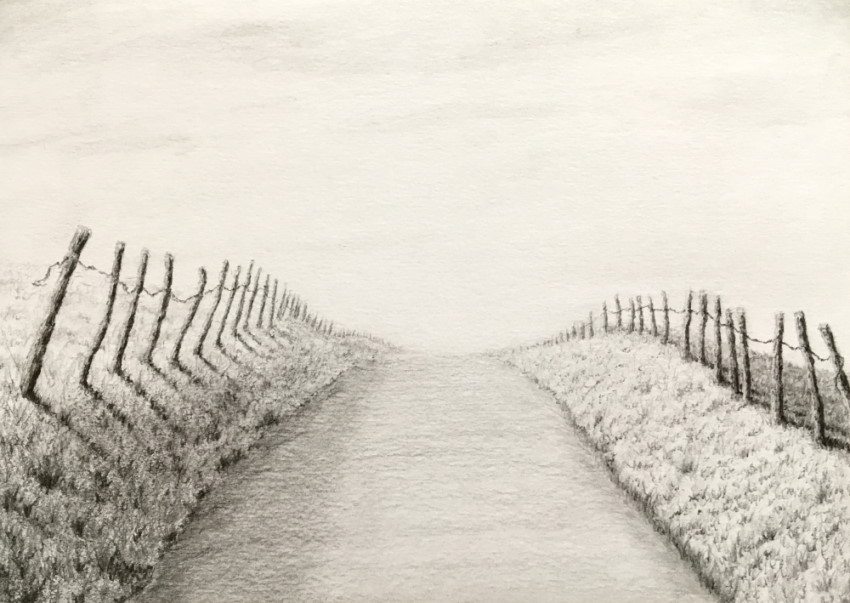
Roads in Perspective
You can apply the techniques for drawing roads to sidewalks, rivers, rails or anything that curves or changes altitude.
Straight Road & Poles
For a straight road, draw some lines from the vanishing point.
Remember that in one-point perspective, width lines are parallel to the horizon, and height lines are perpendicular to the horizon.
Now you can draw a sidewalk.
One way to draw utility poles, is the divide method (finding the center).
Draw the near pole and draw lines from its top and bottom to the vanishing point.
Next, select the distance of a far away pole.

Lastly, for a pole between them, find the middle by drawing two diagonals (divide method).
You can keep dividing to add more poles.
Now you can draw roads with utility poles, fences, etc.
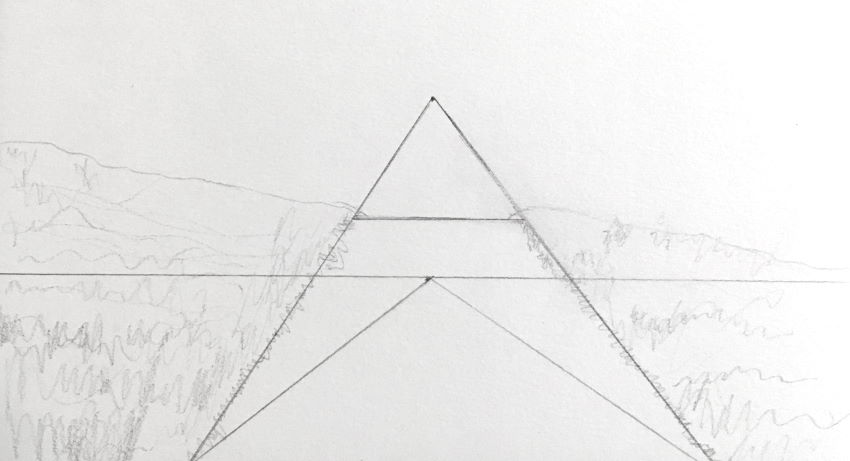
Uphill Road
Start by placing a horizon line, and draw a road (1).
Next, draw a vanishing point above the horizon for an uphill road (2).
The more a road curves upward, the less it is foreshortened.
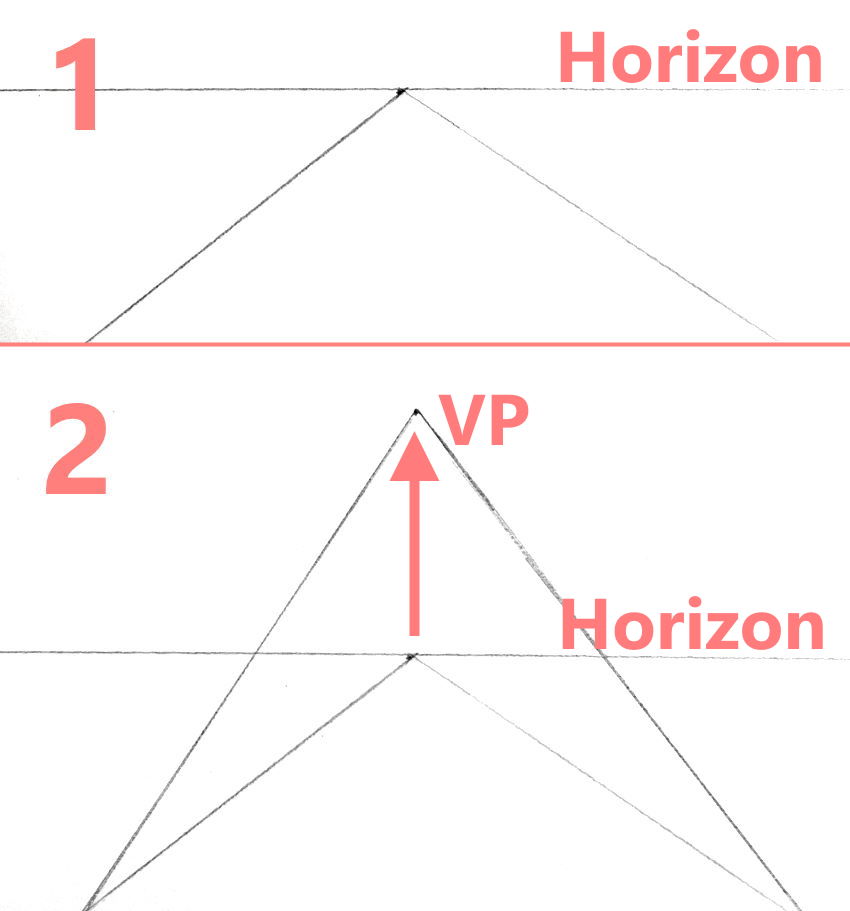
Define where the road stops curving up, and add some details.
Add more details and render your drawing.
Textures are an important part of my rendering style. Here is my texture drawing guide.
Downhill Road
Start by drawing a horizon line and a vanishing point (for the buildings).
For a downhill road, draw a vanishing point below the horizon.
Only the road and the bottom of the buildings (where they touch the road) meet at the lower vanishing point.
The rest meet at the top vanishing point (on the horizon).

Note:
In the drawing above, in addition to linear perspective, I used atmospheric perspective, which you can read about later in this guide.
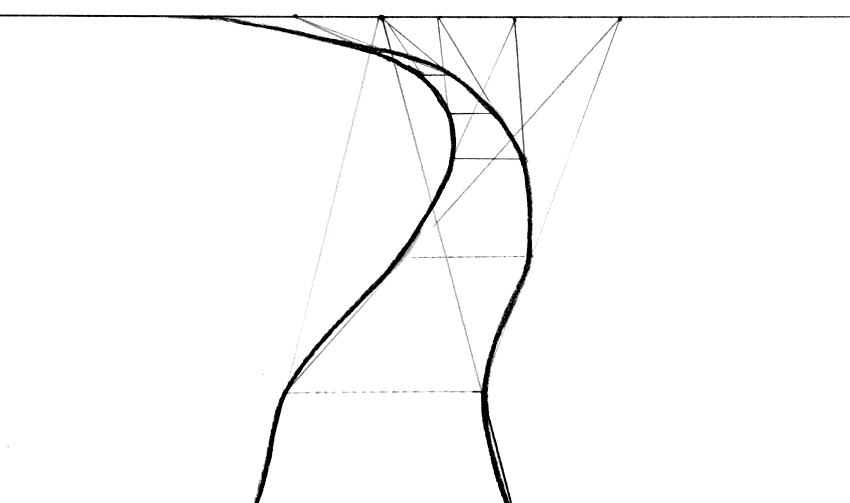
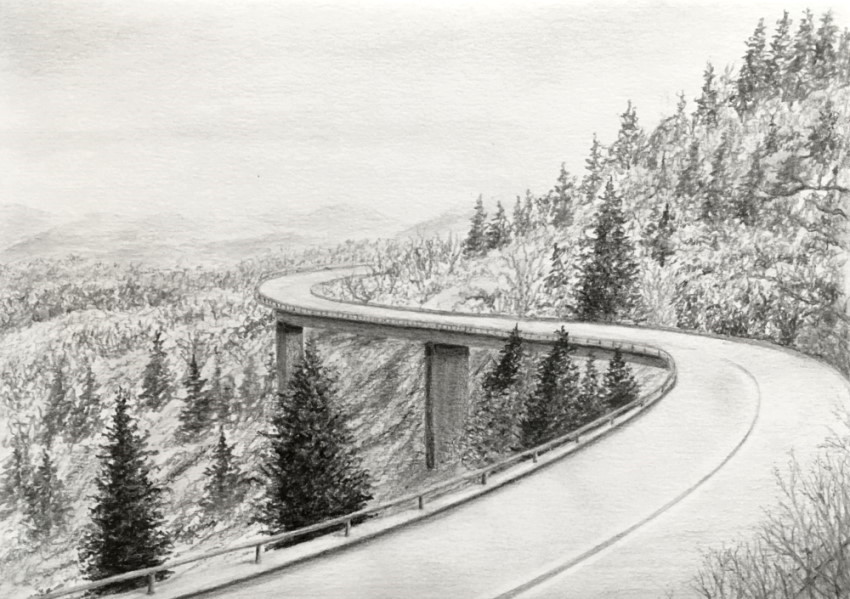
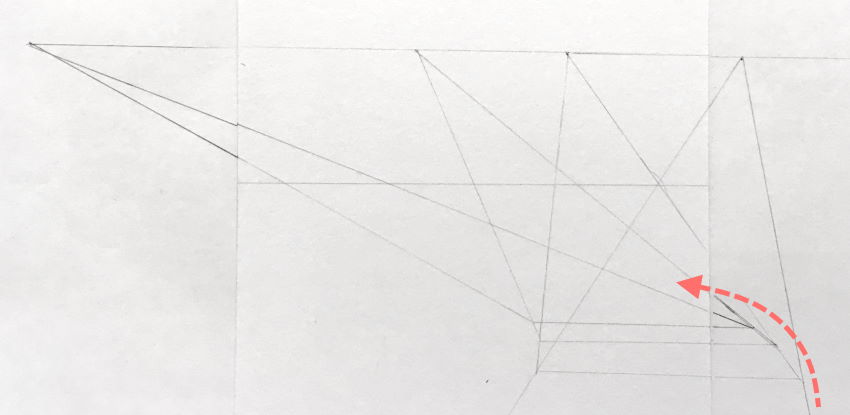
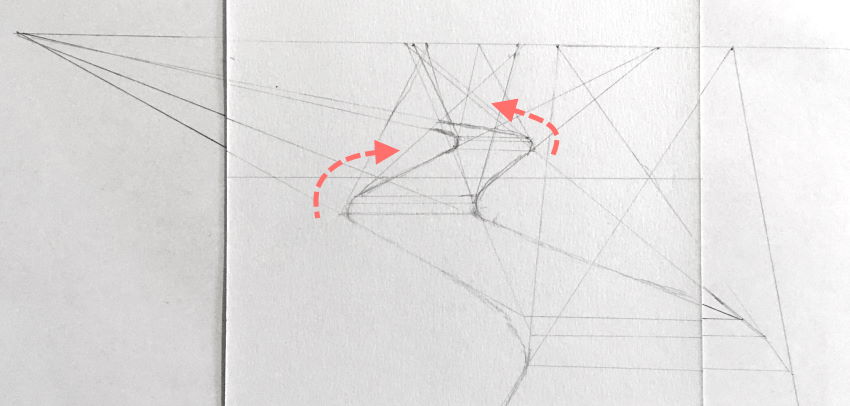
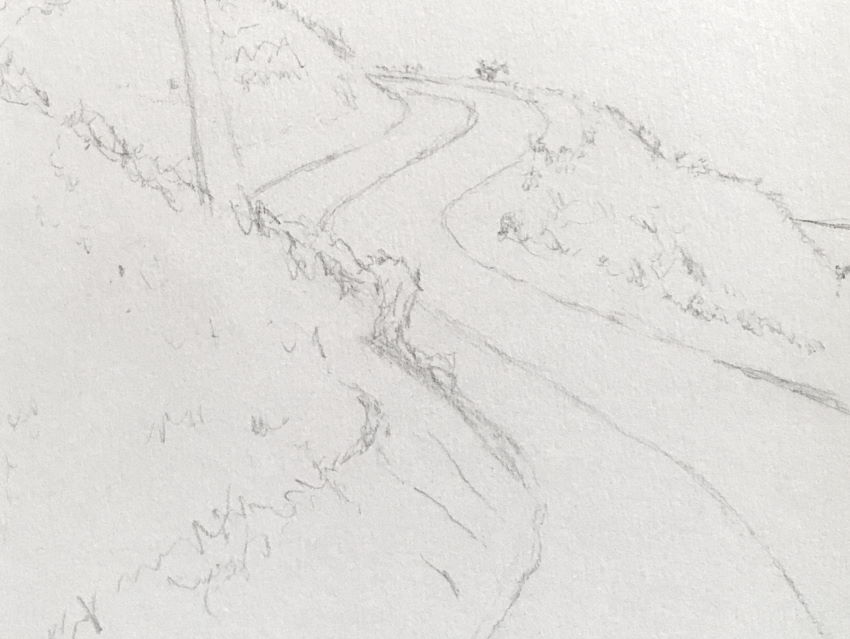
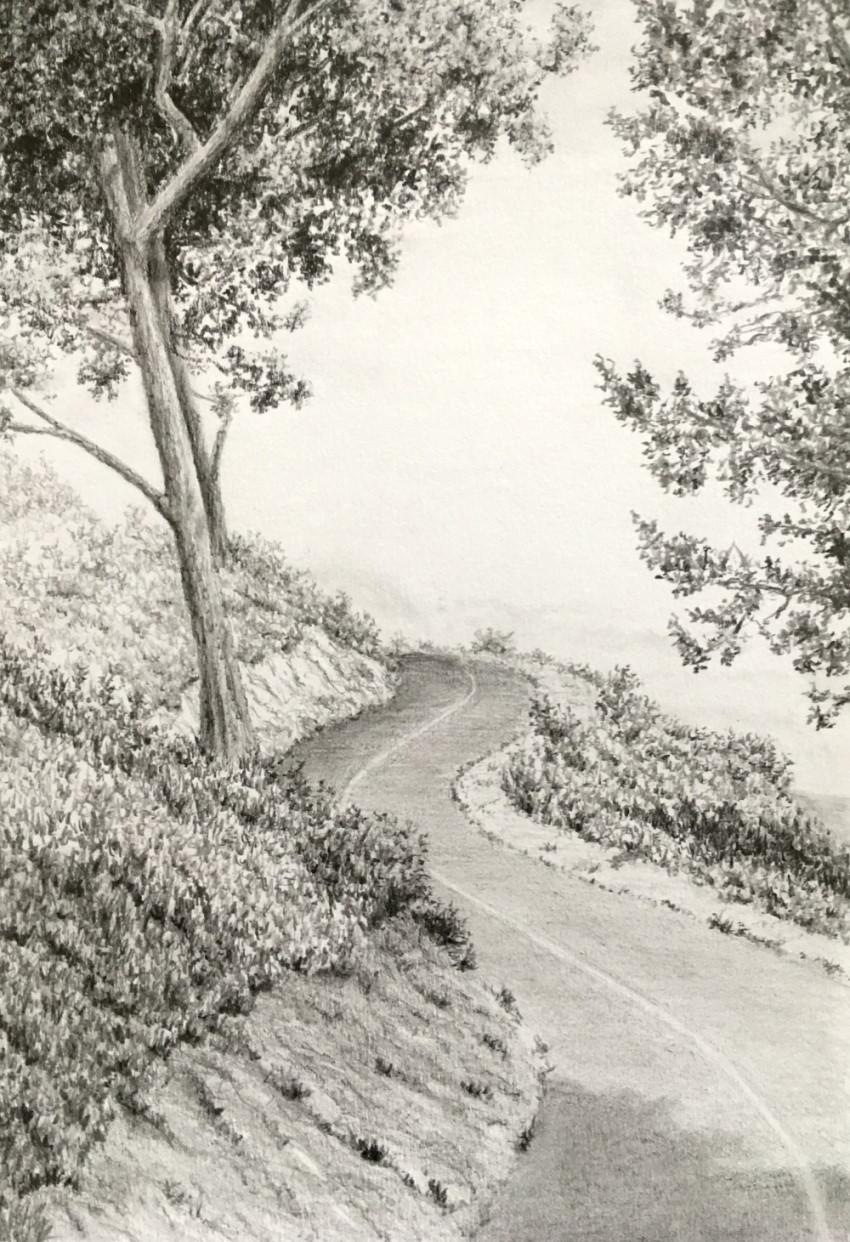
Winding Road
Sometimes, a road that twists and turns, a river that curls, or any path that bends and curves is interesting.
Start by drawing a straight road, and draw a width line in the place you want it to curve.
Draw a new vanishing point for the direction you want it to curve.
Then, draw another width line for a new curve.
Keep adding vanishing points in the direction you desire, and new width lines for places the road curves.

Lastly, draw a curvy line between the curve points.
Tip:
If your road curves outside the paper, connect another paper sheet in that direction, or put a larger paper sheet below it.

Round the lines for the road and add some details.

Finally, refine your drawing.
Uphill Winding Road
You can draw an uphill (or downhill) road and curve it.
Start by drawing a horizon line, and draw a road to a vanishing point above the horizon.
Use vanishing points (above the horizon) to rotate the road to the left.
Then, rotate it right and left again.
Add some guidelines for your drawing.
Finally, render your drawing.
Note:
Trees are a part of many drawings, especially landscape and cityscape.
Here is my guide on how to draw realistic trees.
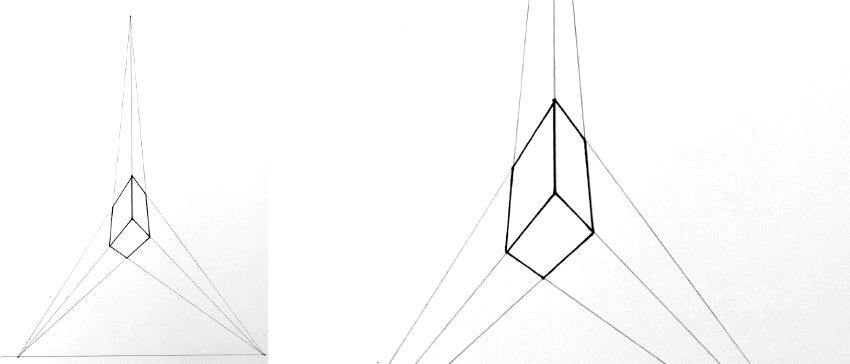
Two-Point Perspective
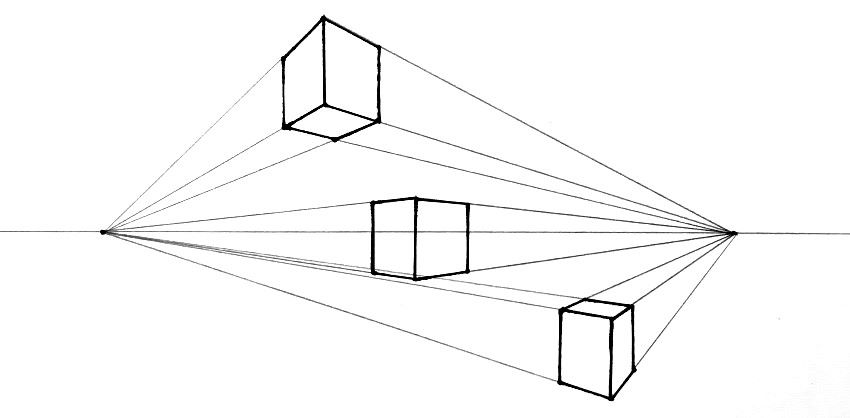 Boxes in 2-point perspective
In one-point perspective, lines that represent height are parallel. They are perpendicular to the horizon.
Lines that represent width are parallel to the horizon.
Only lines that represent depth meet at the vanishing points.
In two-point perspective, only lines that represent height are parallel. They are perpendicular to the horizon.
Lines representing width and depth meet at vanishing points.
In two-point perspective, there are two vanishing points.
How to Draw a Room in Two-Point Perspective
To draw a room, first practice drawing full boxes. A room is the back part of a box.
Use the same methods as you did for one-point perspective.
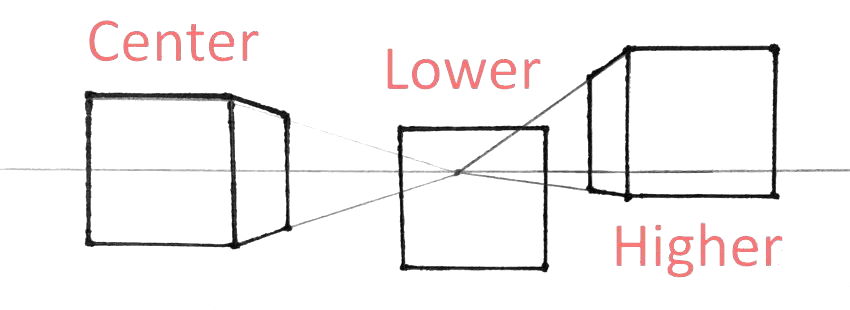
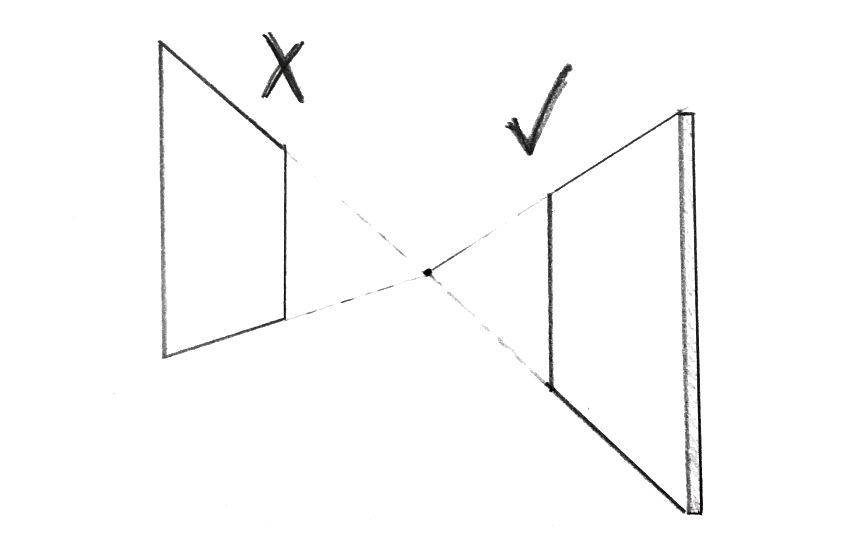
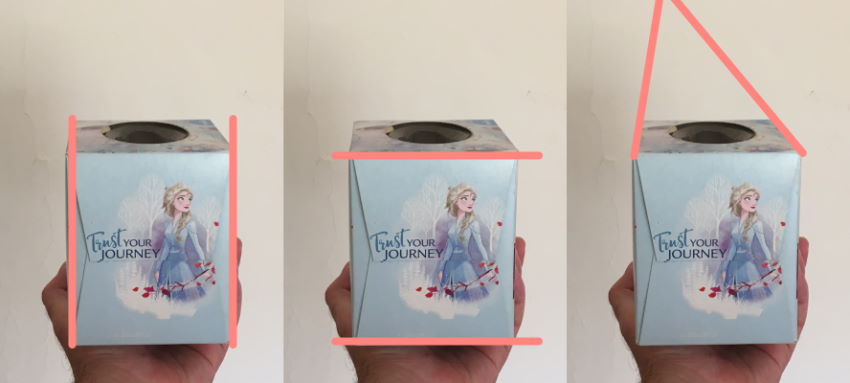
Where to Place Vanishing Points?
While drawing in perspective helps to create scenes realistically, it can sometimes produce odd or unnatural-looking results.
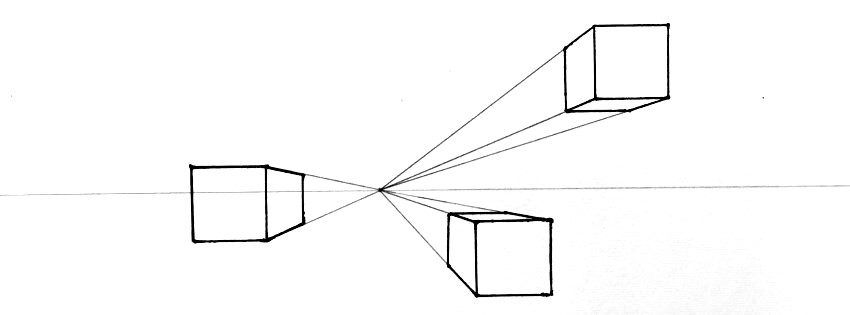
Depending on an object's size, different positioning of vanishing points on the horizon line produce different perspectives.
If the outcome looks too pointy, move the vanishing points farther apart.
 Vanishing points placement
Keep in mind:
When there are several objects at different angles, they may use different vanishing points.
Good to know:
When drawing in 2- or 3-point perspective, in most cases, the vanishing points are outside the drawing paper.
If your paper sheet is small, you can use a large paper sheet below it.
If you draw on a large paper sheet, connect another paper sheet for each side.
Use masking tape to connect the paper sheets (as seen in the example above).
These are my recommended paper brands for drawing.
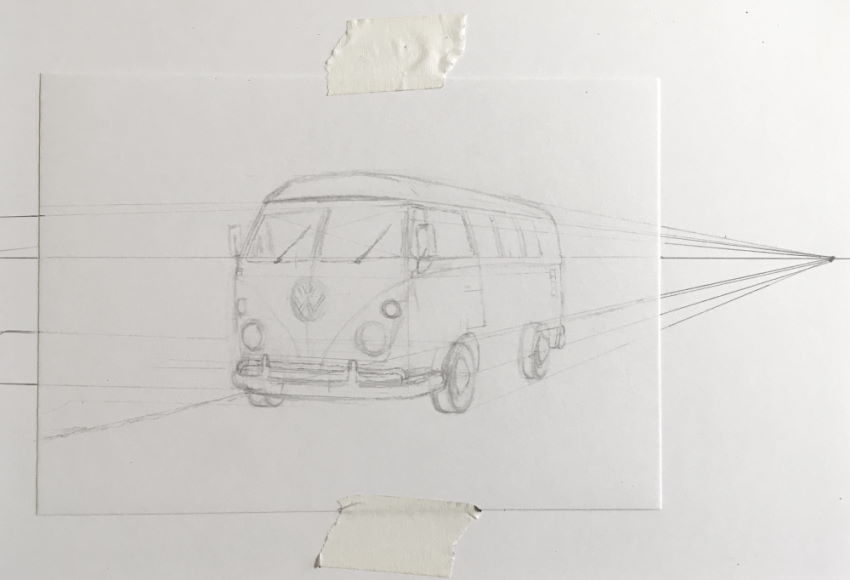
 Volkswagen Type 2
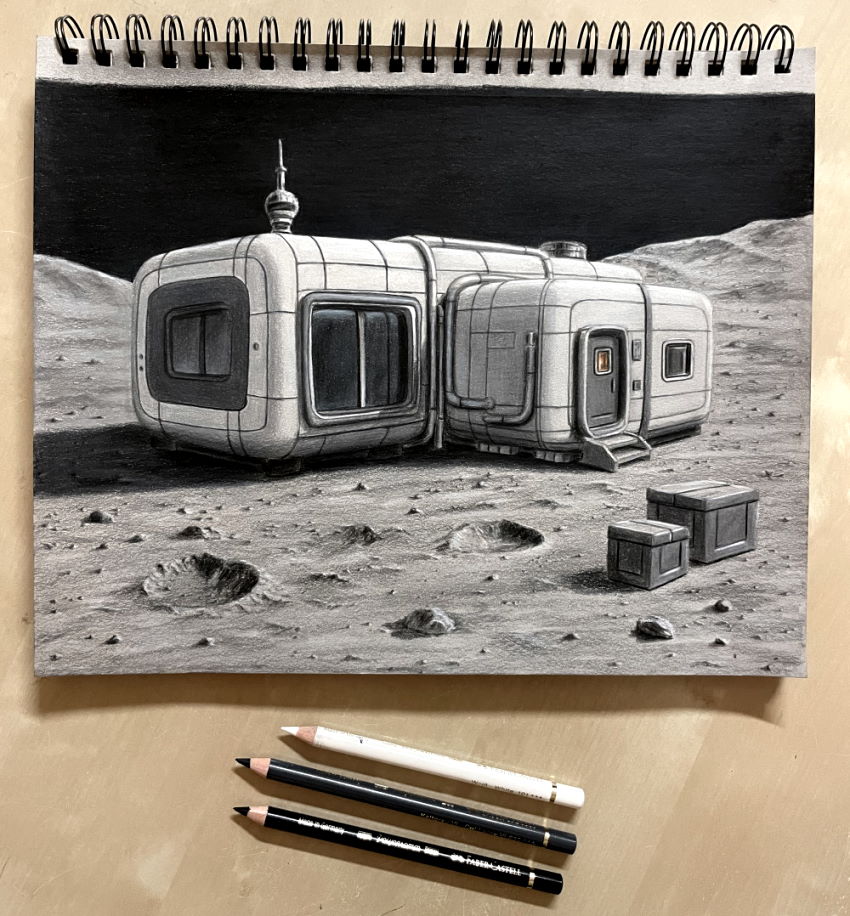
How to Draw a Villa in 2-Point Perspective
When using the full surface of a paper for drawing, the vanishing points are usually quite far.
While perspective drawing with rulers is time-consuming, the outcome is somewhat like a coloring page.
All that is left to do is to fill each area with brightness values and pay attention to edges and transitions (in values).
Once you get used to drawing in perspective, you can do it without rulers.
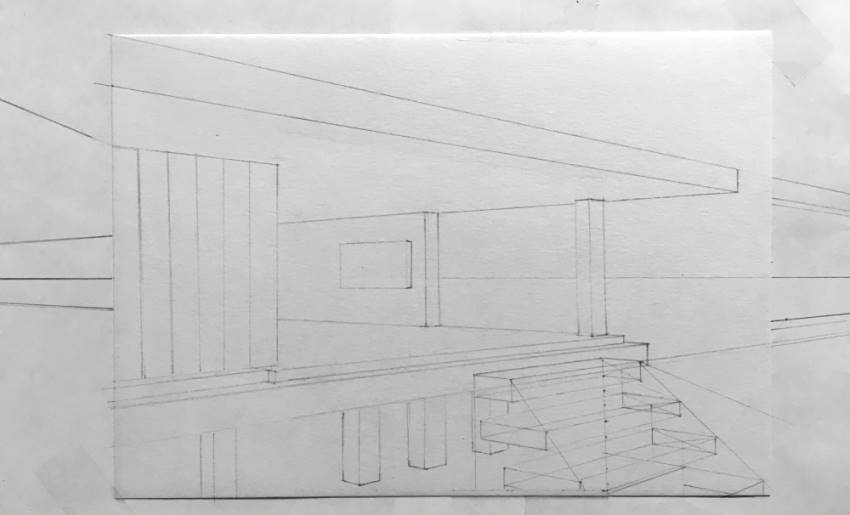
In many cases, an exterior drawing is like a box, and an interior drawing is the inside of a box.
Sometimes, though, the exterior structure looks like an interior structure.
As in the previous example, I did not use rulers or vanishing points for this drawing. I just imagined where the vanishing points should be.

The more you practice drawing in perspective, the more complex your structures will become.
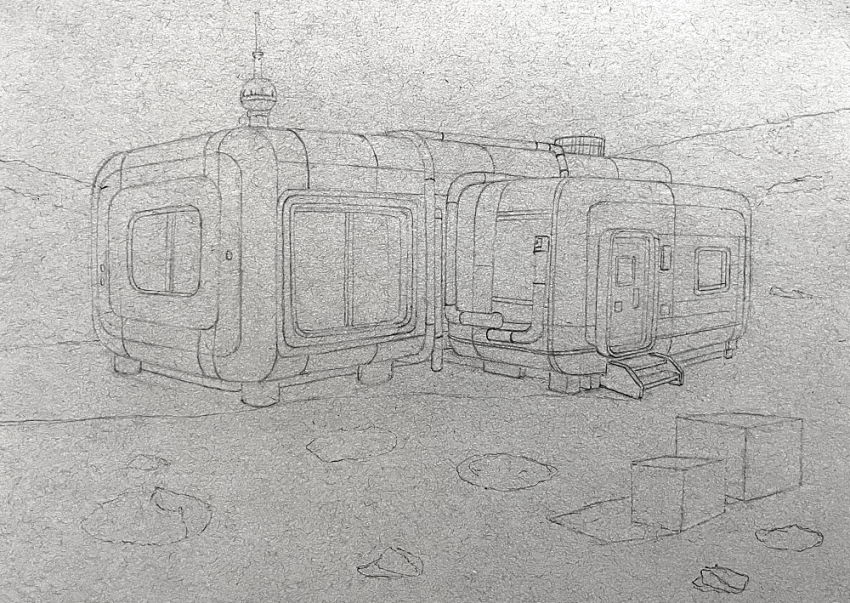
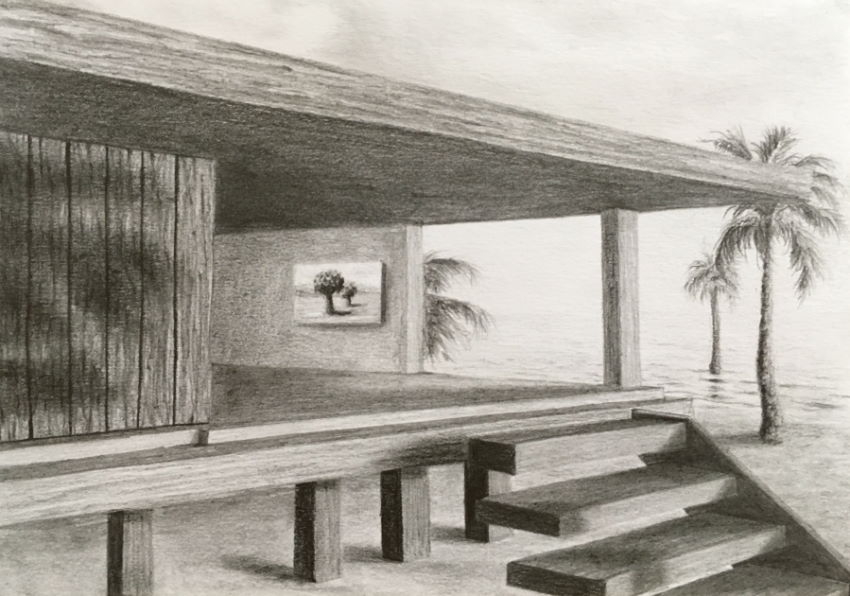
In this example I used colored pencils.
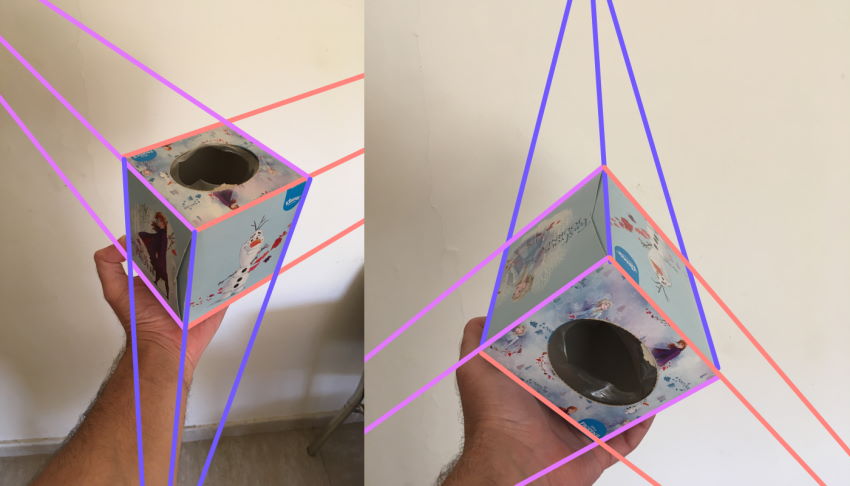
Three-Point Perspective
 Boxes in 3-point perspective
Use Three-point perspective when looking at an object from above or below. For example, a bird's-eye view or a caterpillar view.
In three-point perspective, ALL lines that are parallel in reality meet at a vanishing point.
Atmospheric Perspective
Atmospheric perspective, in landscape painting (and drawing), is the effect of the atmosphere on the appearance of objects.
As objects are farther away from the observer, the atmosphere has a stronger effect on them, because there are more atmosphere particles that scatter light.
The influence of atmospheric perspective:
- Brightness values: When the sky is clear, the farther an object is, the lighter it is.
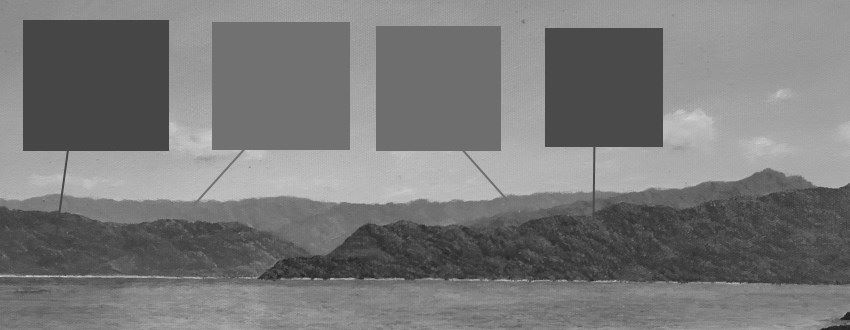 Faraway mountains are lighter
- Saturation: The farther an object is, the less saturated it is. Meaning, its color is less rich and intense.
- Contrast: The more distant an object is from the observer, the contrast between its light and dark values decreases; therefore, its texture starts to disappear. In other words, it has fewer details.
- Edges: The edges of distant objects may be less sharp depending on weather conditions.
- Hue: The color of the sky has a great effect on distant objects. On a clear day when the sky is blue, the hue of distant objects shifts toward blue. At sunset or dawn, the same thing happens with warm hues, such as yellow or red, depending on the color of the sky.
 Distant mountains: less saturated, fewer details, soft edges, hue shifts toward blue
- As mentioned above, close objects are sharper, saturated, and have a strong contrast.
- The brightest and darkest areas are the areas closest to the observer.
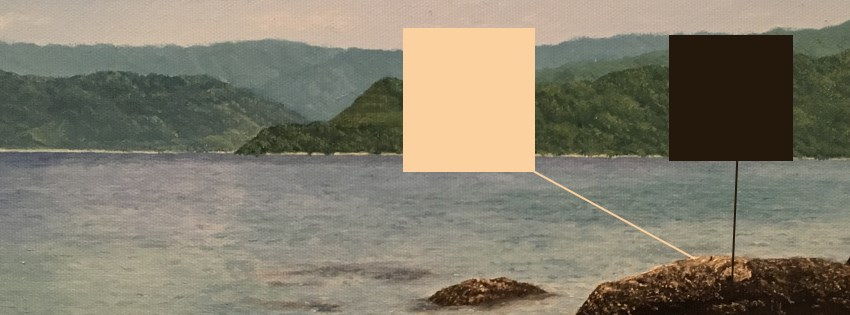 Strong contrast for close objects
Example for an oil painting with the use of atmospheric perspective:
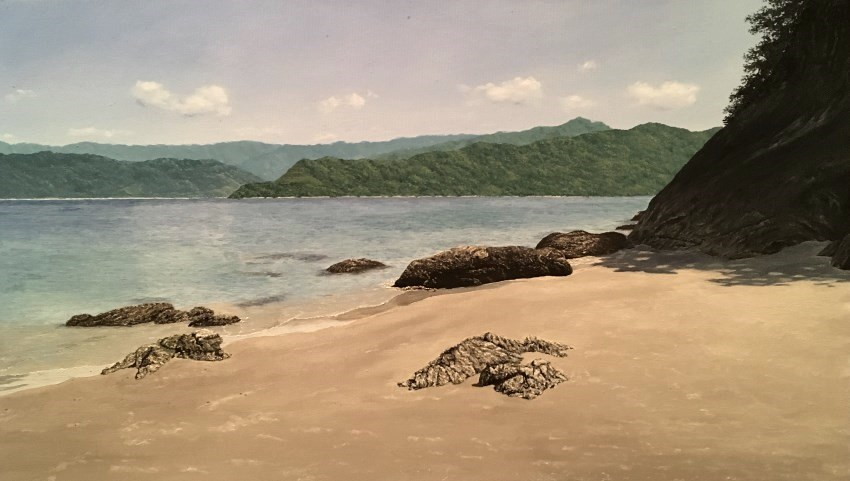 Oil painting 70/40 cm Seashore
Example for drawing using atmospheric perspective:
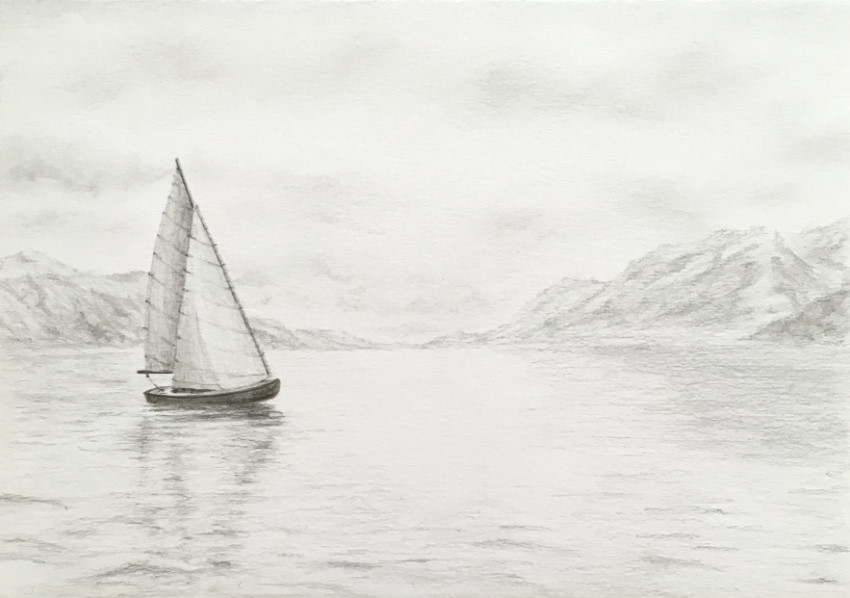 Far mountains have less contrast and details
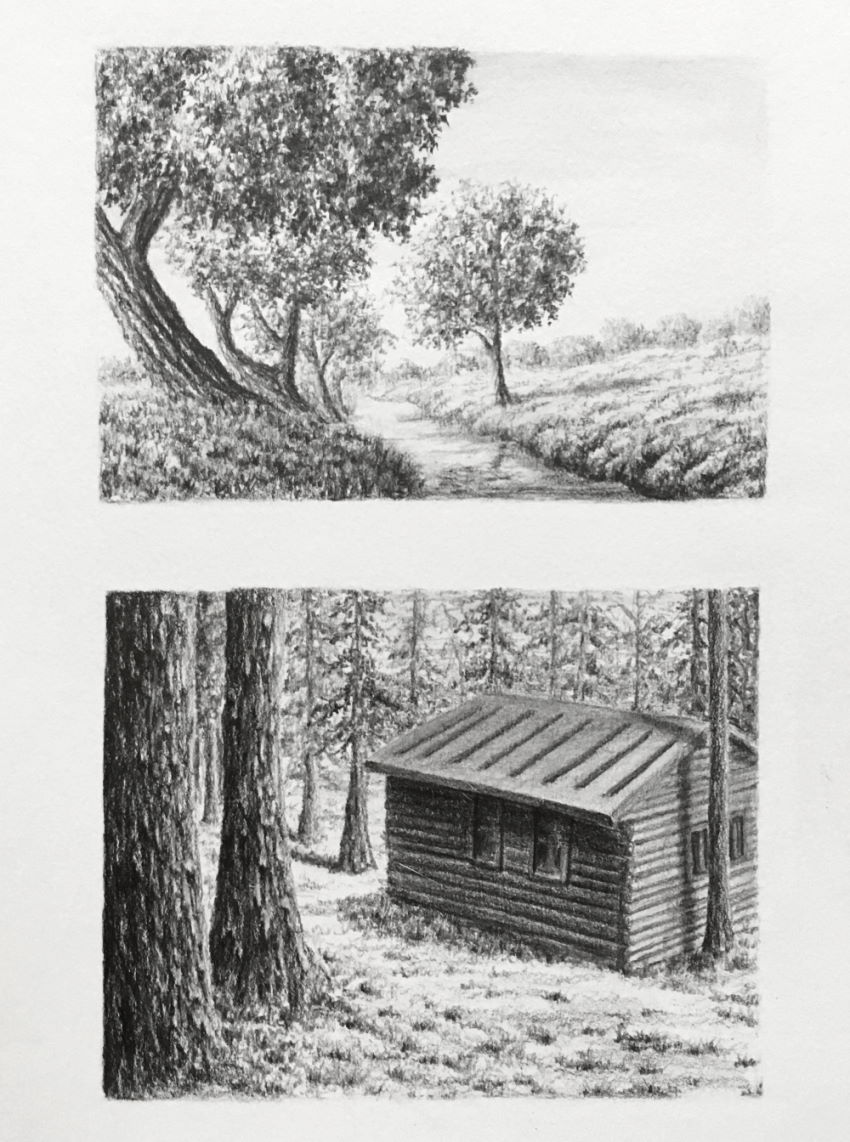
In the next example, I drew two small sketches.
Atmospheric perspective is one of the techniques I used to add depth.
Summary
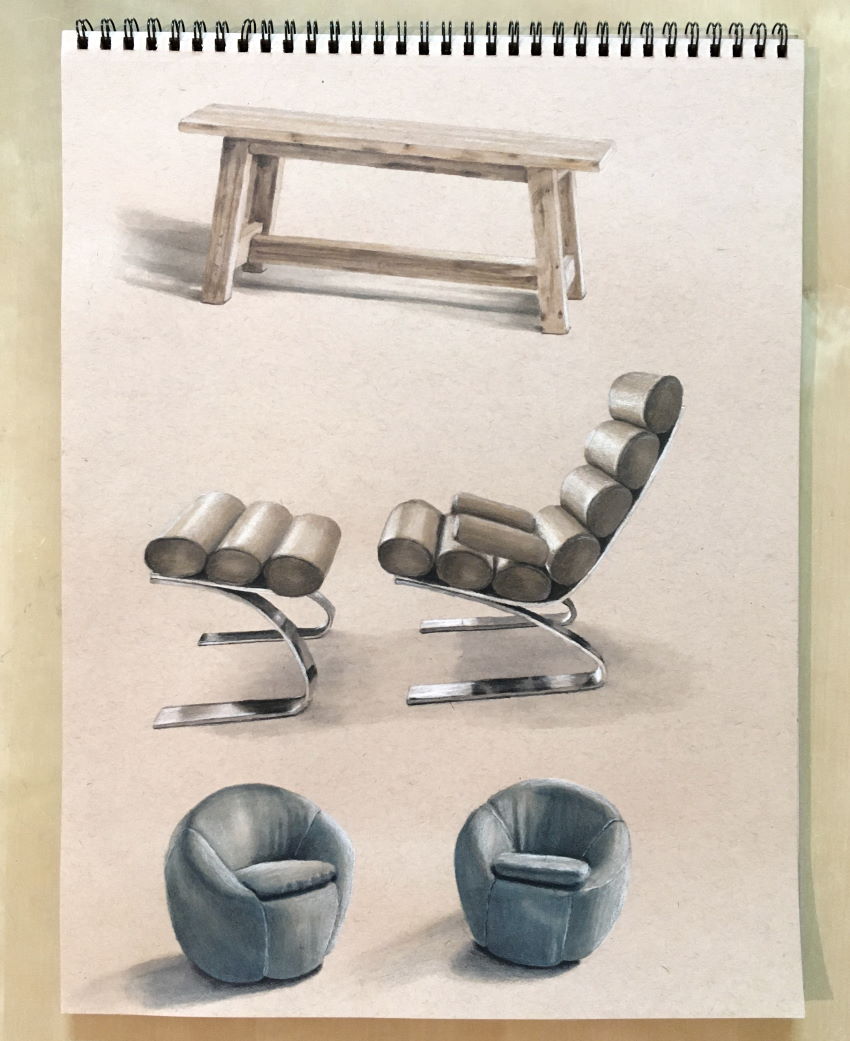
Many drawing styles are based on perspective. For example, concept art, product design, comics, interior and exterior design, and more.
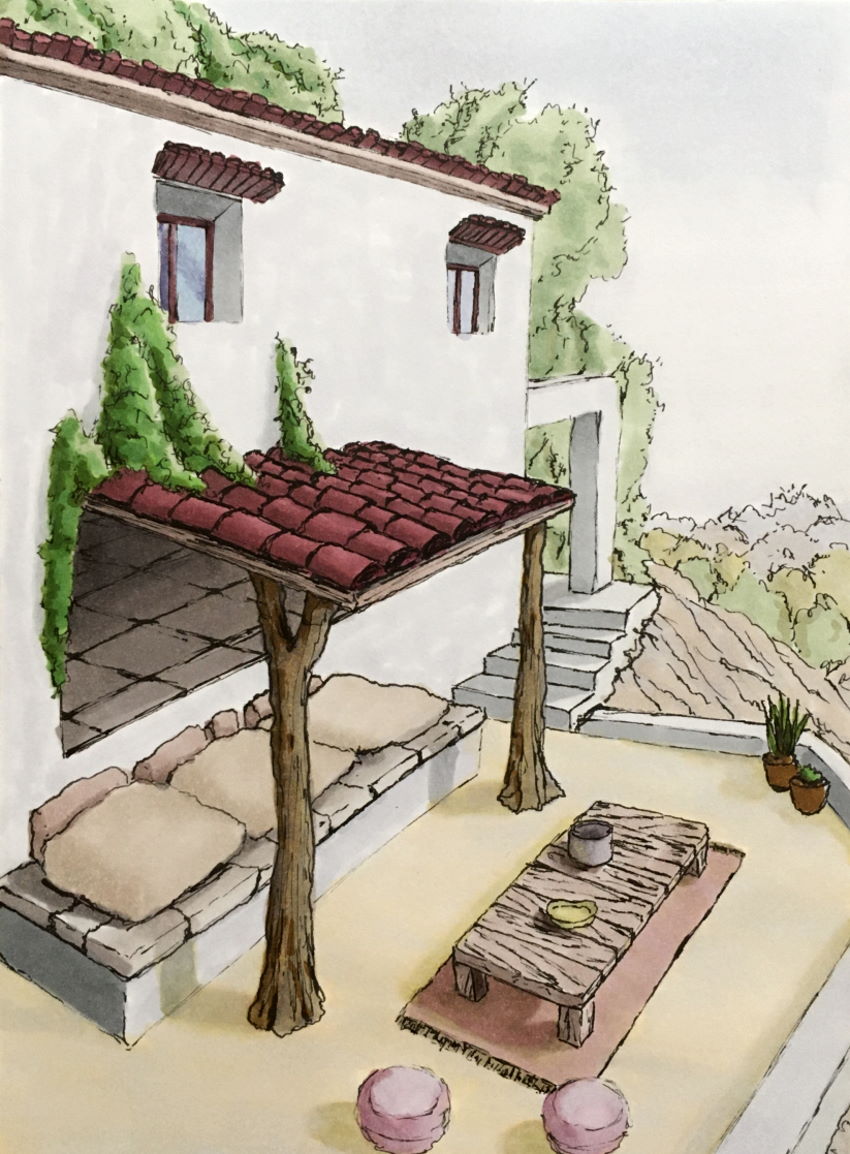
Below is an example of furniture in perspective. I used markers and colored pencils.
For painting realism, check out the 8 key factors for painting realism.
I highly recommend reading my article on drawing the illusion of depth; it has 15 methods to add depth, with many examples.